
Python in Mari – Part 2: Automation Like a Lazy Genius

Introduction
So what is it this time?
Well, for starters, as I’ve mentioned before — I hate repetitive tasks, almost as much as I hate redoing work (usually happens when Kenya Power decides I need to take a break, and I haven’t saved my progress).
If there’s even the faintest whiff of automation in the air, I’ll chase it down. But within reason, right? After all, I’m an artist, not a developer…
And this one feels pretty reasonable. Every time I add images into Mari’s Image Manager, I don’t want to have to fiddle with color spaces manually. Ugh. That’s boring. No points for figuring out what I did..
Quick roadmap — what I did (short version)
Here’s the journey in one neat little list so you know where we’re headed:
- I’ll determine the color space required for each image from its filename — having already mentioned that all my shit is always named accordingly,
- Find out how to actually set the color space settings of an image – this part was fun!
- Add a right-click action in Mari’s Image Manager so you can run the fixer manually if required.
- Auto-run the same logic whenever a new image is added (but only for new images).
The steps the script performs when you click “Set My Default Color Space” (or when an image loads) are simple:
- Obtain images from the Image Manager (easy — Mari gives you them).
- Extract and parse the filename to determine what the map is (diffuse, normal, metalness, alpha, etc.).
- Apply the correct color space configuration to each image.
1. What’s in the Box Image Manager
Nice and simple start: before I add menu items or auto-hooks to Mari, I need to figure out what is currently in the Image Manager, pull their filenames, and decide what kind of map each one is (diffuse, normal, metalness, alpha, etc.), catergorize them, if you will…
For now, I am using the Python console natively in Mari.
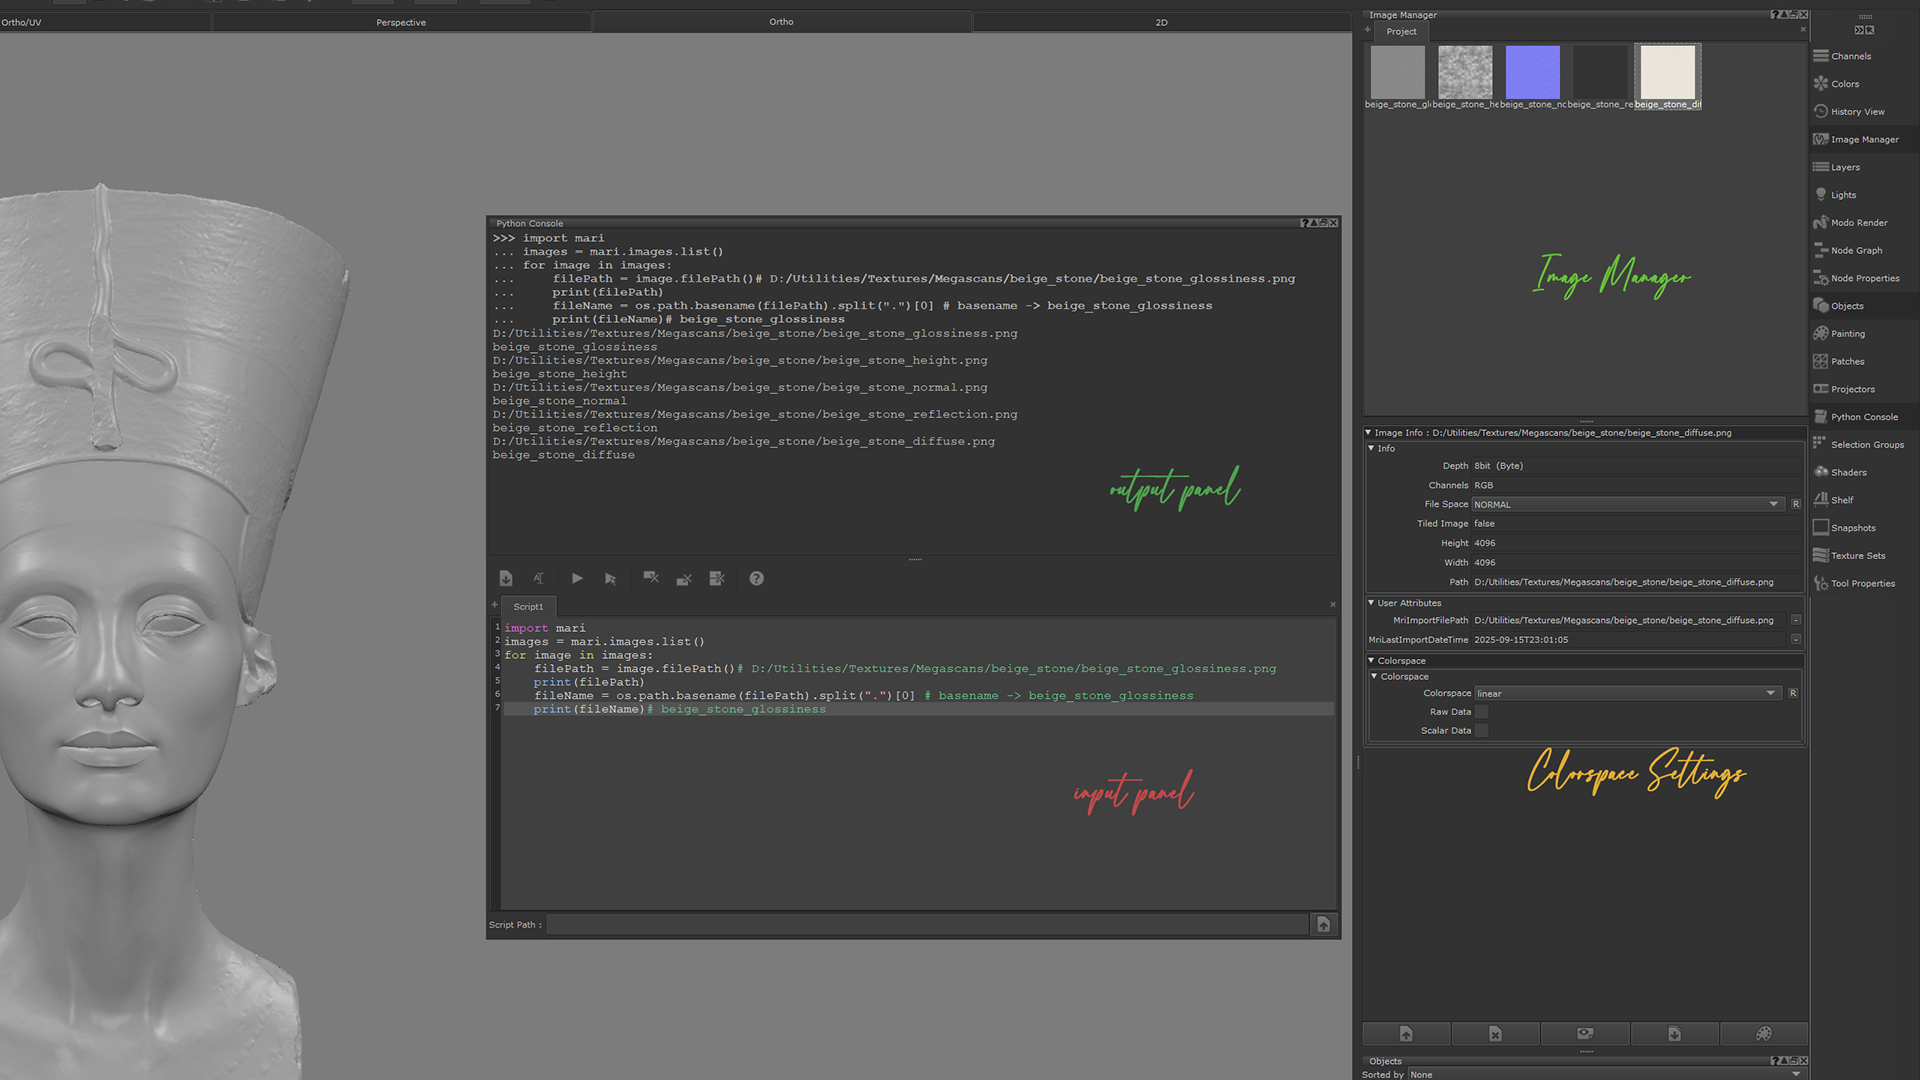
Now that I have the images and their file names, I need to determine what kind of resource it actually is, diffuse, metal etc.
The filename will usually have some kind of hint in their name to tell you this, so i will search for this in the filename and use that to determine what kind of file it is.
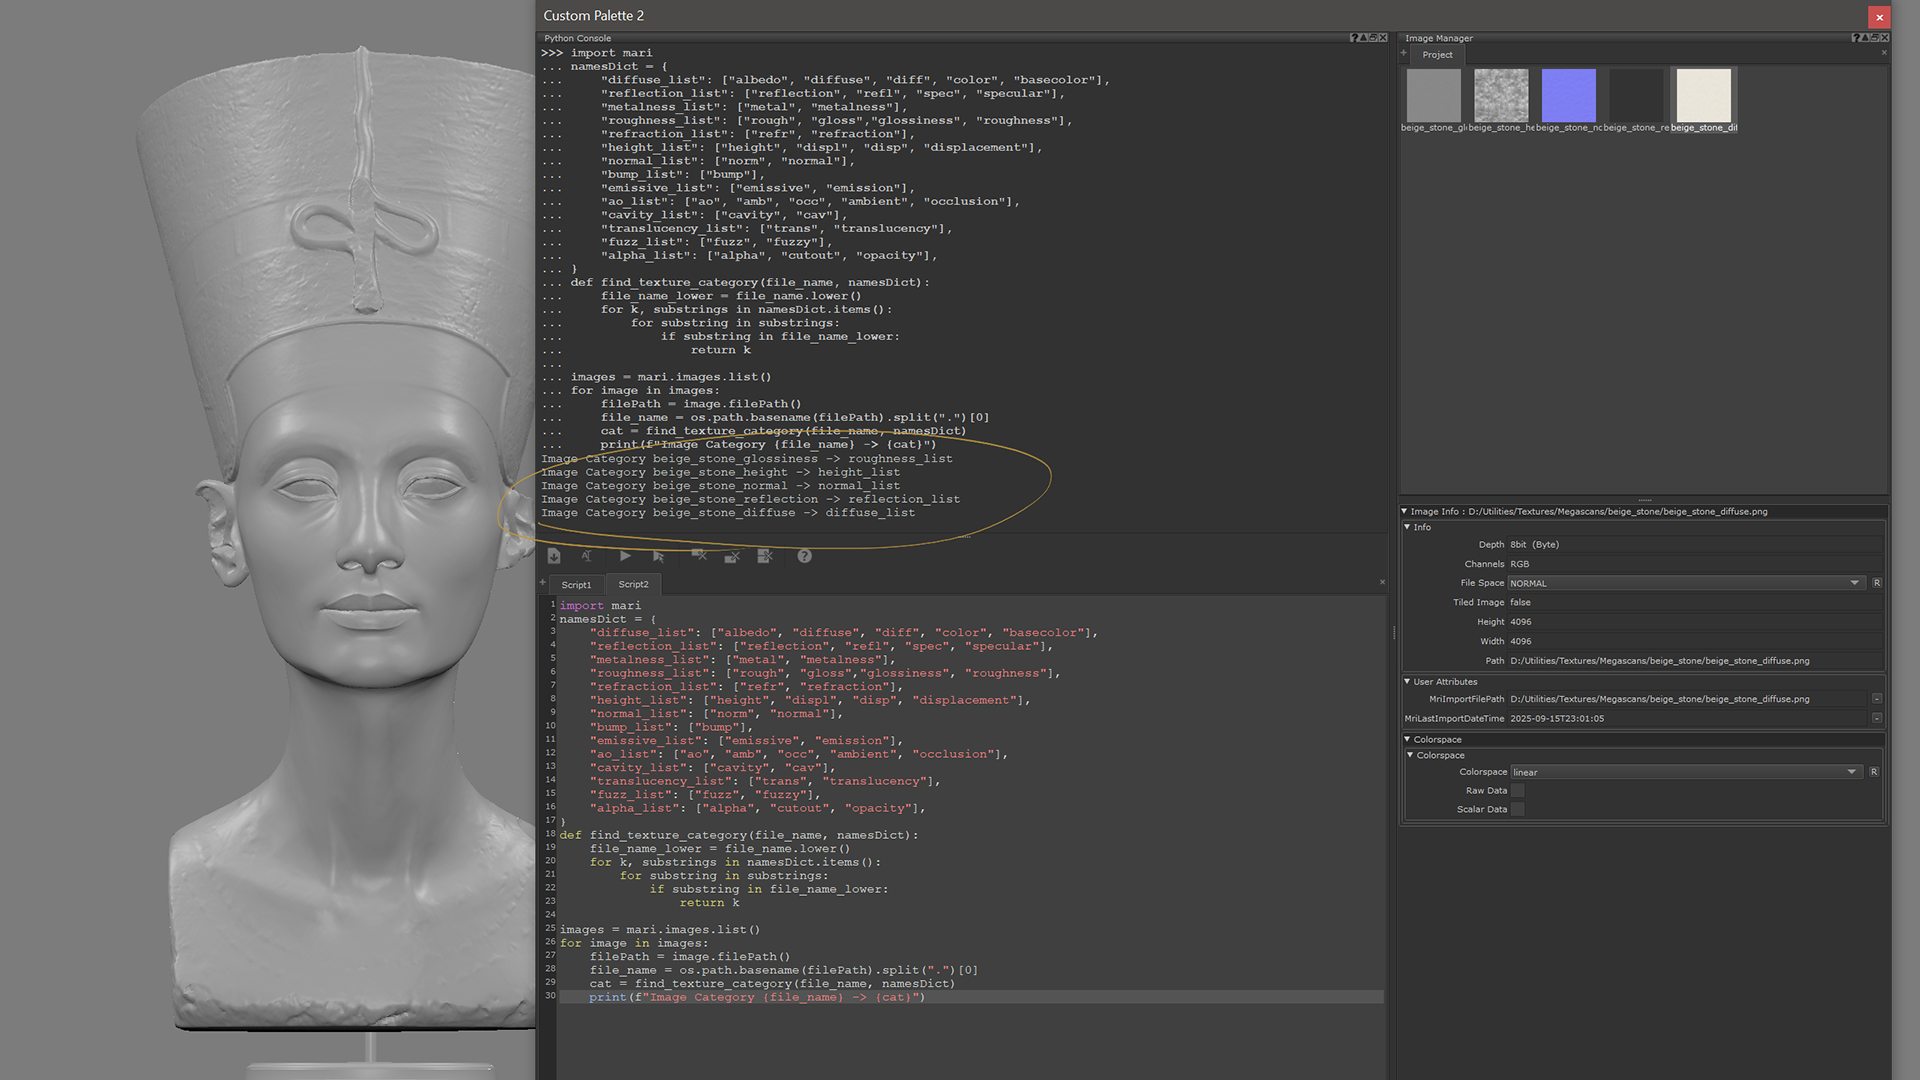
For this I will define a dictionary with all the possible extensions, prefixes, suffixes that I can think of that can be used to hint information about the resource. I also used this same dictionary when I was creating materials, story for another day.
The I can now return the actual image category.
re later
re laterRight now I’m using the quick-and-dirty "substring in string" approach to spot keywords like "diff" or "normal". It works, but it’s also a bit too forgiving. For example:
That’s not wrong, but it’s not precise either — "basecolor" and "color" should probably be treated differently.(It won’t be, in this case, but..)
Python’s re module (regular expressions), a bit more complicated, and I avoid whenever possible, however with regex I can:
- Match whole words or boundaries → e.g.
_normalat the end of a filename. - Avoid accidental overlaps →
"color"won’t accidentally trigger on"basecolor". - Stay case-insensitive without calling
.lower(). - Handle patterns instead of exact substrings — like matching both
"displ"and"displacement"with a single rule.
So "in" is fine for prototyping, but regex makes the matching logic way more robust when filenames start getting messy.
2. Wrestling with Image Colorspace
How do you even set the colorspace for an image?
Waaahhht.
This one had me stumped for way longer than I’d like to admit. Mari’s API doesn’t make it straightforward at all, and the errors it throws are just cryptic enough to keep you spinning in circles.
Here’s a rundown of the things I tried (and why they didn’t work):
First attempt: setColorspaceConfig
Error:
🧐 Error decoding:
My thought process here: “Ok, I’m giving it COLORSPACE_STAGE_WORKING, that must be a valid configuration value, right?”
Wrong. Mari isn’t expecting a stage constant here, it’s expecting a full ColorspaceConfig object. But I didn’t know that yet.
Mari is saying: “Hey, you’re passing in a ColorspaceStage (like COLORSPACE_STAGE_WORKING), but I only accept a full ColorspaceConfig object.”
In other words, I was handing it the wrong type. I thought I was giving it a valid config, but really I was just passing a constant
Second attempt: setColorspace
Error:
🧐 Error decoding:
Classic Python AttributeError. The method I was calling doesn’t exist on the Image object. Python even tried to help by suggesting: “Did you mean setFileSpace?” (Spoiler: I did try it, and nope, that wasn’t right either.)
At this point, I thought: “Ah, maybe Mari renamed the method. Let’s try setFileSpace. Mari know best..”
Third attempt: setFileSpace (with arguments)
Error:
🧐 Error decoding:
This one was simpler — Python’s just saying I’m passing too many arguments. The function only expects one, but I tried giving it two (stage and 'linear').
Ok, fine. Let’s strip it down.
Fourth attempt: setFileSpace (single argument)
Error – getting tired of this particular tune:
🧐 Error decoding:
Mari’s telling me: “Nope, not that either. I don’t want a ColorspaceStage, I only accept a FileSpace object.”
In other words, I was on the wrong track entirely.
Fifth attempt: back to setColorspaceConfig (two arguments)
Error (again – why would I think I would get a different response):
🧐 Error decoding:
Same story as attempt one. The method is crystal clear: it only accepts a ColorspaceConfig object, but I kept trying to shoehorn in constants and strings.
At this point I was running in circles.
I even explored whether I could somehow trigger a UI click event on the dropdown instead of setting it programmatically (spoiler: nope, no dice).
The breakthrough: examples to the rescue
I finally found the solution buried in the example files (colorspace.py) that ship with Mari. Turns out Mari doesn’t want you to just pass in strings or constants. Instead, it expects you to:
- Grab the image’s existing
ColorspaceConfigobject. - Modify its properties.
- Pass the modified object back into
setColorspaceConfig.
It’s roundabout, but once you know this pattern, it clicks.
Here’s the correct approach:
And finally — no errors. I threw a bash! 🎉.
Why Mari makes you do it this way
Mari’s API treats ColorspaceConfig as a whole “settings object.” Instead of tweaking individual attributes directly on the Image (like image.setColorspace(stage, 'linear')), you’re expected to clone the current config, adjust it, then reapply it.
Think of it like editing a preferences file: Mari wants you to take the full configuration, change what you need, and save it back — rather than toggling little switches piecemeal. It’s unintuitive at first, but it does mean you’re always working with a complete and valid config.
Other values you can use:
The call:
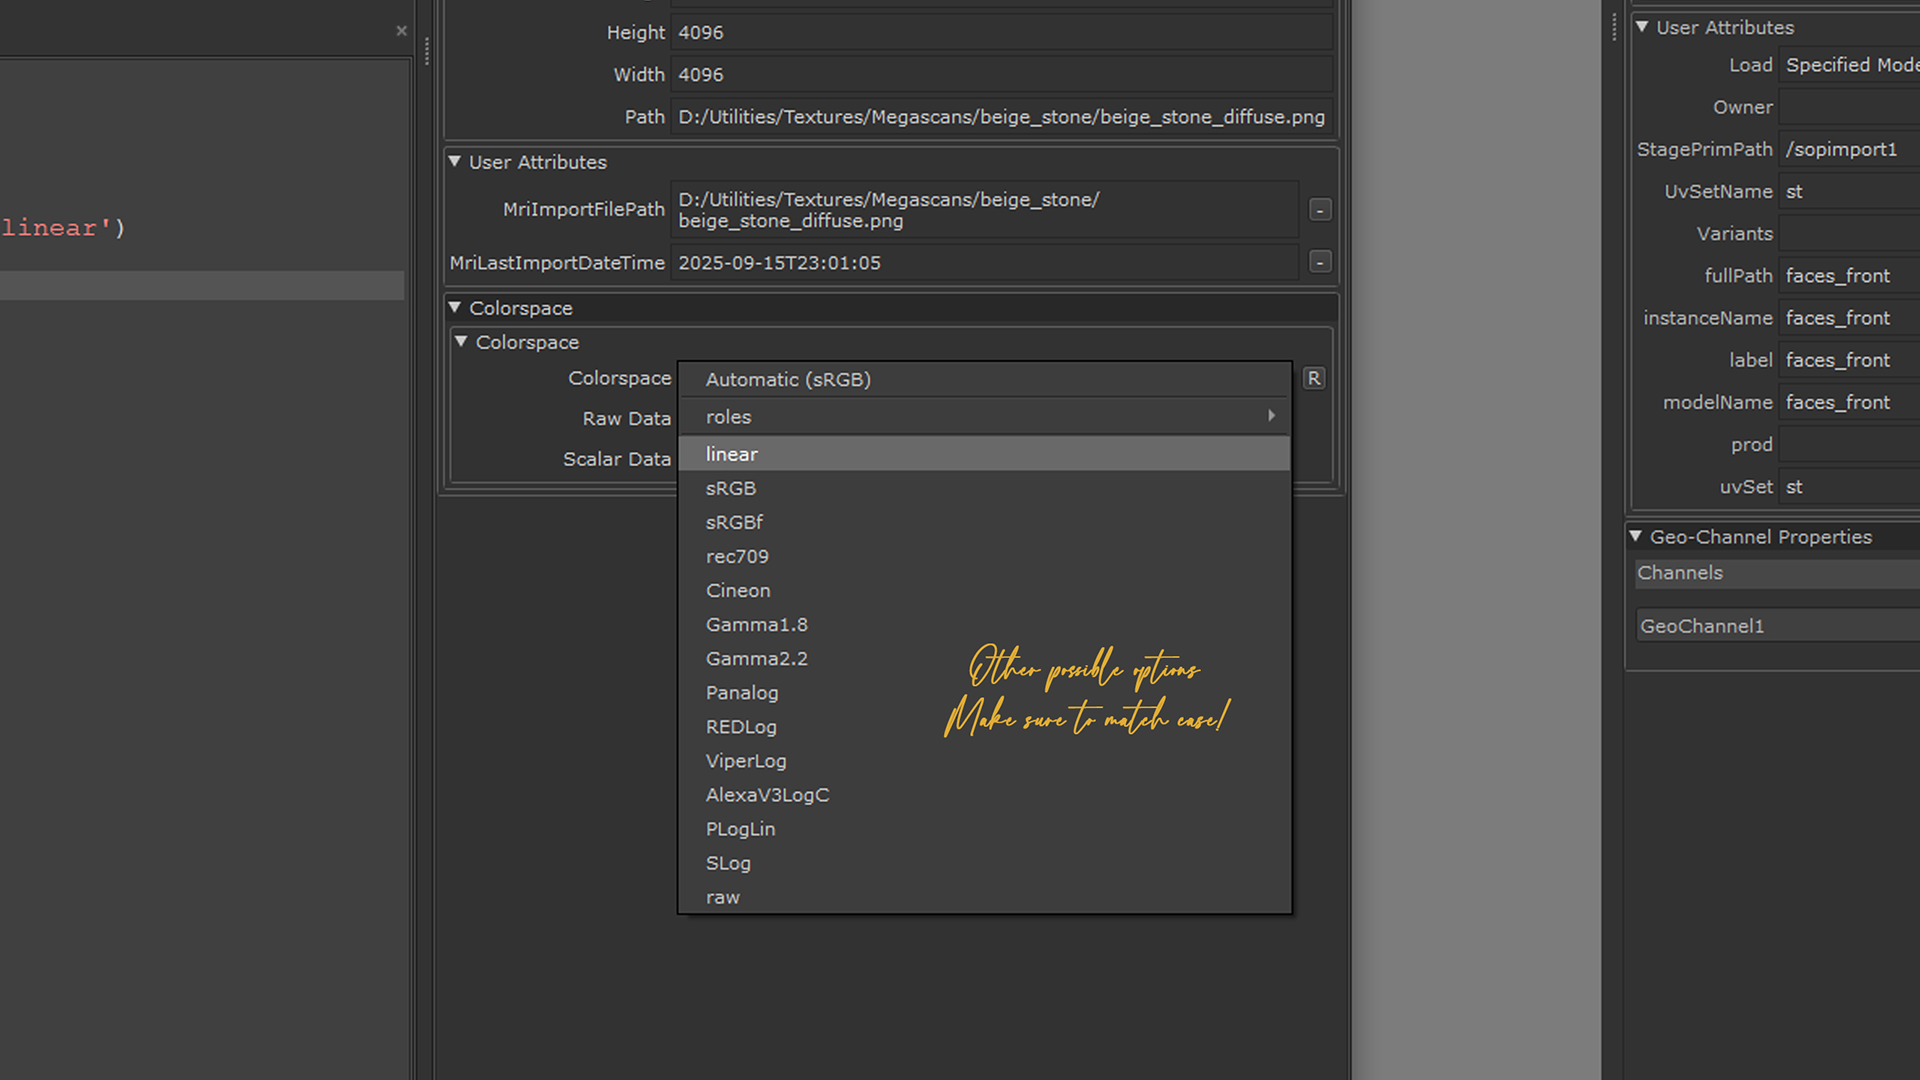
lets you substitute 'linear' for any of the strings you’d see in Mari’s Colorspace dropdown menu. That means you can default all your images to 'linear', 'sRGB', or whatever your pipeline prefers.
Now that I had this working, I could update my earlier code to apply default colorspaces automatically to all images.
3. Hooking into Image Load Events (a.k.a. “Can Mari just tell me when new stuff shows up?”)
Next challenge: I wanted Mari to tell me whenever a new image was dropped into the Image Manager. Sounds simple, right? Just ask Mari “hey, did someone add an image?”
Well… not so fast.
This part was confusing because Mari’s API doesn’t give you plain callable methods for this. Instead, most of these events emit signals (this comes from the underlying PyQt system Mari is built on).
PyQt Signals in a Nutshell
If you haven’t dealt with PyQt before, here’s the deal:
- In PyQt, events don’t work like normal functions you call. Instead, things like “an image finished loading” emit a signal.
- You attach your function to the signal using
.connect(). This creates a link between the event (signal) and your function (slot). - When the event fires, your function runs automatically.
So this line:
…means: “Whenever imageLoaded fires, call my identify() function.”
You don’t call identify() yourself — Mari does it when the signal triggers.
First (messy) attempt: tracking before vs. after
At first, I thought I had to track which images existed before and after a load event, then figure out which ones were new.
The logic here:
- Save a list of all images before the load starts.
- Save another list after the load finishes.
- Compare them with a set difference (
after - before). - Whatever’s left is the new image(s).
And it worked… but wow, what a roundabout way to do it, and more difficult to keep track.
Facepalm: Mari does it for you
Turns out, I massively overthought it. Mari will happily hand you the image object as soon as it loads, straight into your callback. No set comparisons, no bookkeeping.
That’s it. Every time an image loads, Mari passes the image object directly into onImageLoaded(). From there you can grab:
image.filePath()→ the file’s path on diskimage.name()→ the name inside Mari- and any other properties you want
No need to track before/after states, no set comparisons, no global variables. Just connect and go.
And yes, I really did smack myself in the head for not realizing this sooner.
4. Putting It All Together
Now that I can detect new images as they land in Mari, the next natural step was to actually do something useful with them. My original goal was to have Mari automatically categorize and assign the right colorspace depending on the texture type — so I wouldn’t have to manually flip through menus every single time.
Here’s the full working script I ended up with:
Now, every time I drag-and-drop textures into Mari, they immediately slot into the right category and get the correct colorspace. No more manual flipping through menus. Just drop in your maps and get painting.
5. Setting Up a Custom Action in Mari’s Menu
Thus far, I have been testing everything in Mari’s Python Console. That’s fine for quick experiments, but not exactly something you want to re-type every time you launch Mari. The next logical step was to package my scripts so that:
- They load when Mari starts.
- I can trigger them on demand via the Image Manager’s right-click menu.
- They also run automatically whenever new images are dropped in.
This way, the “colorspace fixer” can be like:
Adding a custom menu action
Mari allows you to register context actions on the Image Manager. These show up when you right-click, and they can live inside their own submenu with an optional icon.
Here’s what I added to my hello_mari.py (which runs on startup):
Now when I right-click inside the Image Manager, I get a new submenu:
It feels like a real extension — neat, organized, and always there when I need it.
Why importlib.reload()?
importlib.reload()?You’ll notice I reload the module every time. This is mostly a development trick. While I’m still editing myColorSpace.py, I don’t want to restart Mari every time I make a change. By reloading the module, I can update the logic on the fly. Later, once everything is stable, you can drop the reloads for a cleaner startup script.
Separating logic into myColorSpace.py
myColorSpace.pyTo keep things modular, all of the actual categorization and colorspace logic lives in myCustomTools/myColorSpace.py. That way hello_mari.py is only responsible for wiring things up (menus, signals, actions), while the heavy lifting stays in its own file.
At this stage, I now have two ways to apply my colorspace logic:
- Automatically, every time an image loads.
- Manually, whenever I want, via the right-click menu.
And honestly, that’s 90% of the workflow sorted.
6. Conclusion — From Console Chaos to a Real Tool
What started as a simple “ugh, I don’t want to set colorspaces by hand” turned into a pretty decent little Mari extension. Along the way I:
- Fumbled through wrong method calls (
setColorspaceConfig,setFileSpace,setColorspace) until I finally understood Mari’s odd requirement of modifying acolorspaceConfigobject before applying it back. - Wrestled with signals vs. functions, and discovered that PyQt-style
connectis the key to catching new images as they arrive. - Prototyped clumsy before/after image comparisons, only to later realize Mari hands you the image object directly (facepalm moment).
- Built out a dictionary-driven categorization system for filenames — a solid start that I can expand later with regex for even more precision.
- Packaged it all into a repeatable, reloadable setup with
hello_mari.pywiring up actions andmyColorSpace.pydoing the heavy lifting.
The end result? A tool that quietly saves me time, keeps my workflow consistent, and lets me spend more energy actually painting — not fiddling with dropdowns.
And honestly, that’s the part I like most: this isn’t just “code for code’s sake.” It’s automation with a very real payoff.
Final Thought
If there’s a takeaway here, it’s this: don’t be afraid of trial, error, and even a bit of “why won’t this work??” frustration. Half the value of tinkering with Mari’s Python API comes from the detours. The end product is great, but the process teaches you how Mari thinks — which means the next automation idea won’t feel nearly as intimidating.
Now, every time an image lands in my project, Mari does the boring bit for me. Which means I get to do the fun bit sooner.
Nothing like a little automation to make you feel like a lazy genius!
[addtoany]
Recent
-
1
-
2
-
3
-
4
-
5
-
6
-
7
-
8
-
9
-
10
