
Why Freelancers Should Probably Write Stuff Down

I lost all my work.
Okay, that’s a little dramatic. I didn’t lose everything—but I did lose my web server. Some weird cocktail of database corruption and local environment gremlins (don’t ask me to explain it), and suddenly I was staring at a blank screen wondering where my life went wrong. Bottom line: I had to build a new virtual web server from scratch to manage my website content.
It’s been a while since I last went through this, and to make matters worse, the site that originally taught me how to build a web server—DigitalStartup.co.uk—has since vanished into the internet void. It was such a solid resource, especially when I was stubbornly insisting on building an eCommerce site with Magento (never again!). WooCommerce became my go-to — much simpler and far less soul crushing to customize.
Yes, I build my own websites. Freelance life is like that—“Gotta pinch those pennies wherever we can.”
Anyway, I digress.
Way back when, I used to rely on WAMP for local development. But over time, random issues started piling up—network conflicts, licensing software hijacking ports, and mysterious problems that had nothing to do with the actual code. Switching to a virtual machine just gave me cleaner isolation, fewer conflicts, and a much more realistic dev environment that mirrors the Linux servers I actually deploy to – I run my actual live websites on AWS, so working in a similar environment locally just makes sense.
You can read more details about why VM here.
Since DigitalStartup is gone and I needed to create a new record of my setup steps, I was lucky to have some notes—spread out across documents, post-its, and screenshots and Google. So I figured: why not organize them into something useful? What follows is a (mostly) clean, simple checklist to spin up a virtual web server that can run WordPress—or even Magento, if you dare.
0.0 Prerequisites
Before we get into the setup steps, here’s what I used to get my virtual server up and running:
VirtualBox
I started with the latest version (because of course), but it didn’t play nice with my system. After installation, Windows threw a tantrum—complete with BSODs—and refused to boot. A bit of repair wizardry later, I gave up on being up-to-date and just went with the version I knew had worked before:
VirtualBox 7.0.8 — Stable, safe, no drama.
You can download older versions from the VirtualBox Download Archive.
Ubuntu Server Edition
The latest version of Ubuntu Server worked just fine—no issues here. I went with the LTS (Long Term Support) version for stability. You can grab it from the official site:
No need for a GUI; the command line is more than enough for what we’re setting up. Plus, it keeps the VM lightweight.
So much for the preliminaries, on to the main event!
Hades


1. Installing VirtualBox
Pretty straight forward, just a matter of installing as admin and letting it do its thing. It asked to restart the machine after, no biggie. Windows booted up just fine with this version.
Moral of the story: sometimes going with the slightly older, proven version saves you the stress of debugging whatever the “new and improved” surprises the latest release brings.
1.1 Creating the Virtual Machine
Setting up the new VM:
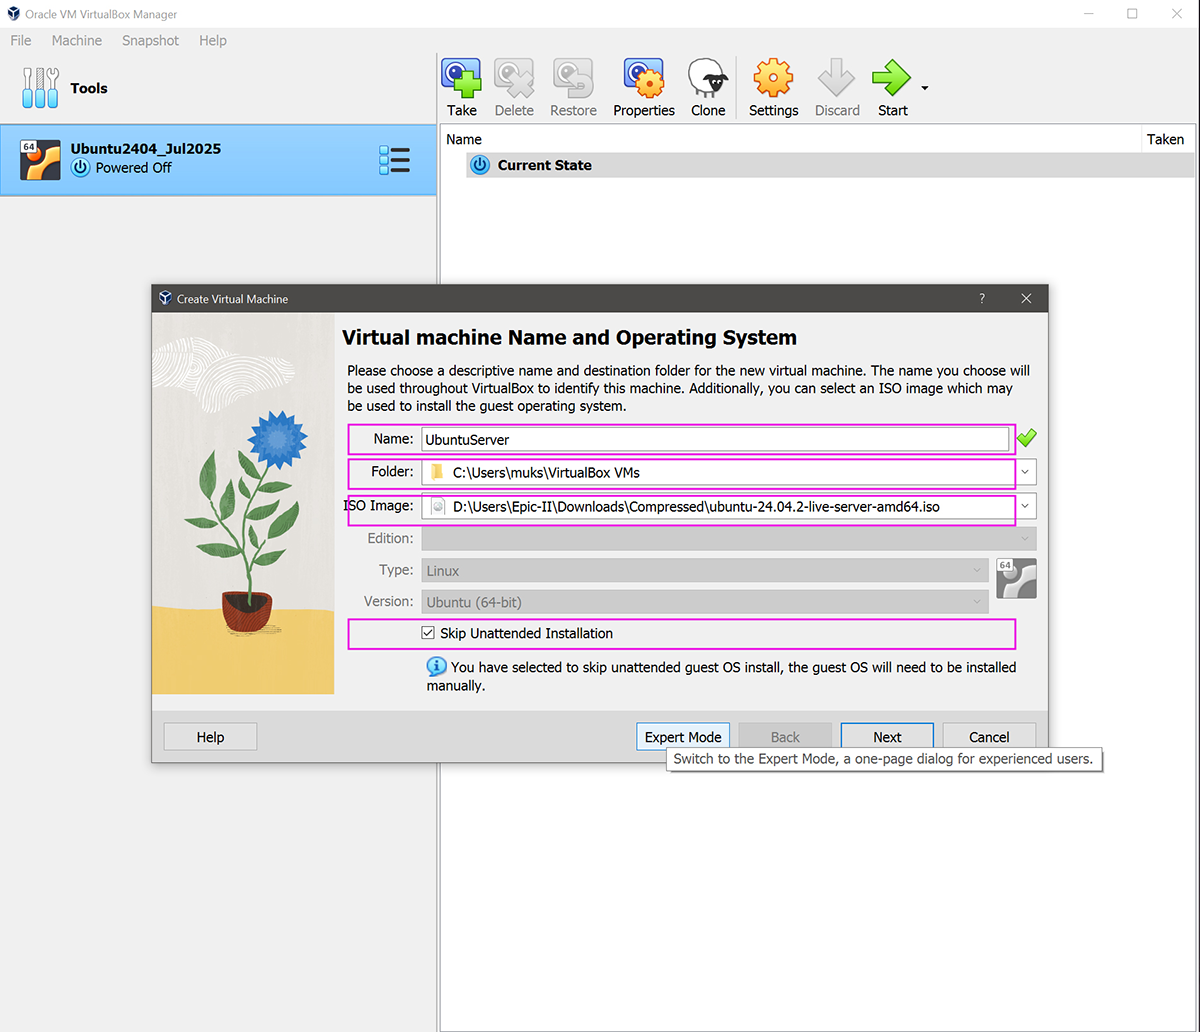
1.1.1 Create a New Machine
- Go to Machine > New…
- Give your machine a name. Something a bit more meaningful than just UbuntuServer. Personally, I like to include the Ubuntu version and the date I created it—makes it easier to manage versions later (especially when I start taking snapshots).Example:
Ubuntu-22.04-Loc-0724 - Choose the folder where the machine will be saved. The default is fine unless you’re picky (I sometimes am).
- Under ISO Image, browse to and select the Ubuntu Server ISO you downloaded earlier.
- Important: Be sure to tick “Skip Unattended Installation”. This gives you full control over the installation process. Then click Next.
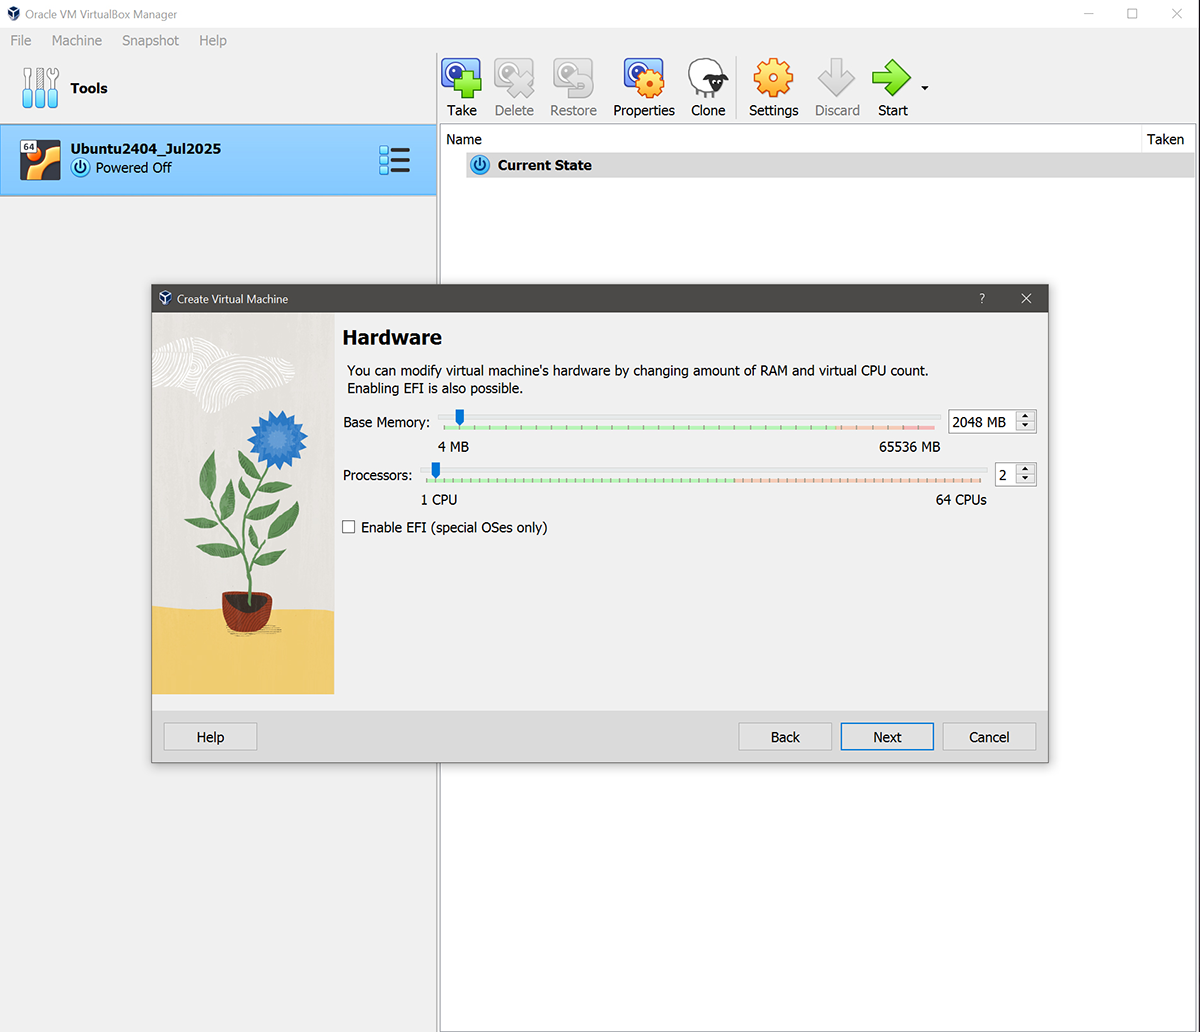
1.1.2 Allocating Resources
Here’s where you decide how powerful your virtual server gets:
- RAM: At least 2 GB (2048 MB)
- CPUs: 2
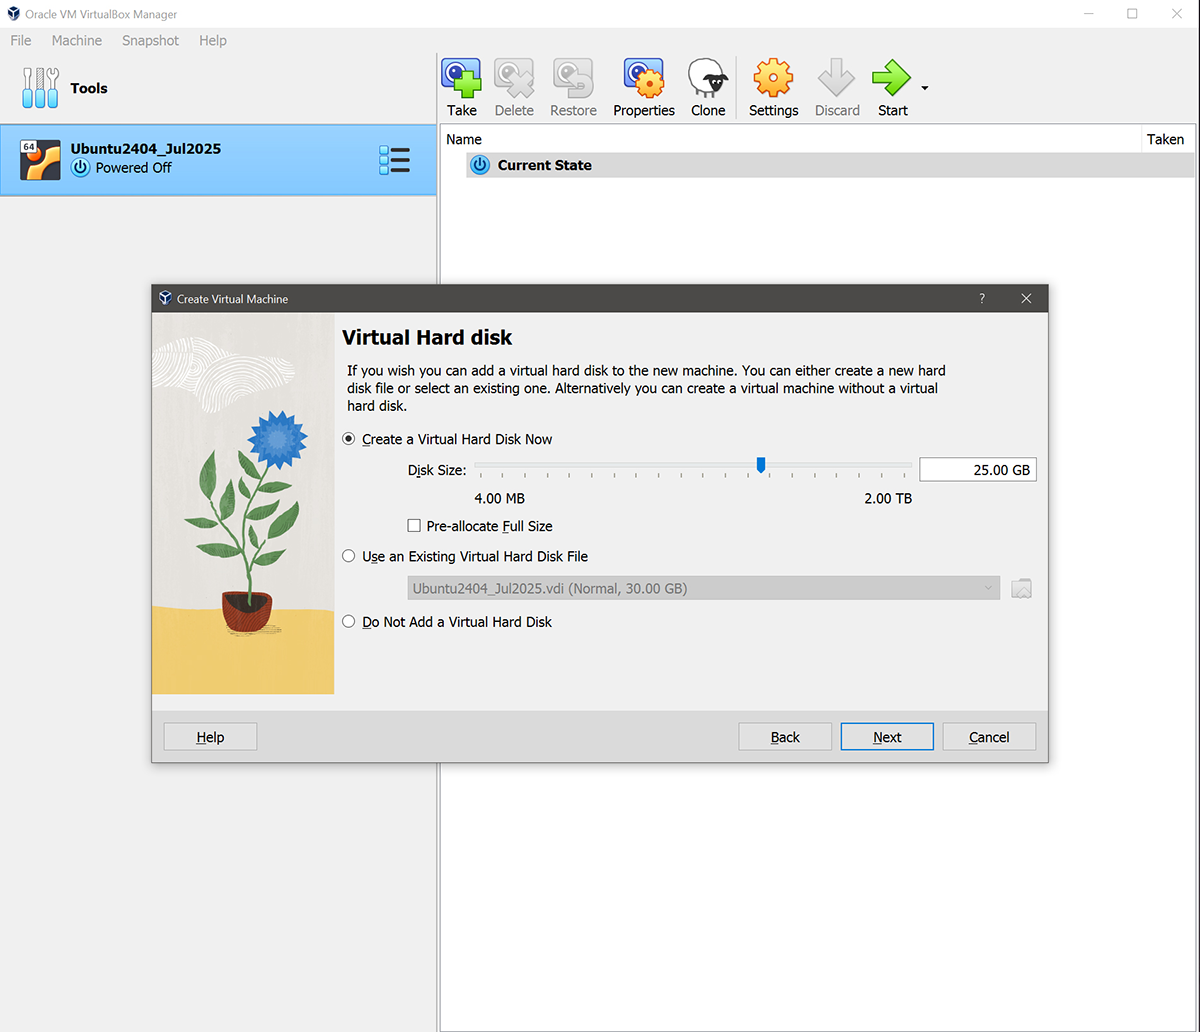
- Hard Disk: 8 GB minimumIf you have more resources, feel free to go higher—your future self might thank you. Some web apps like WooCommerce, especially once you start adding plugins and products, can get a little hungry. Giving your VM (and your actual live server) a bit of breathing room now can save you troubleshooting later
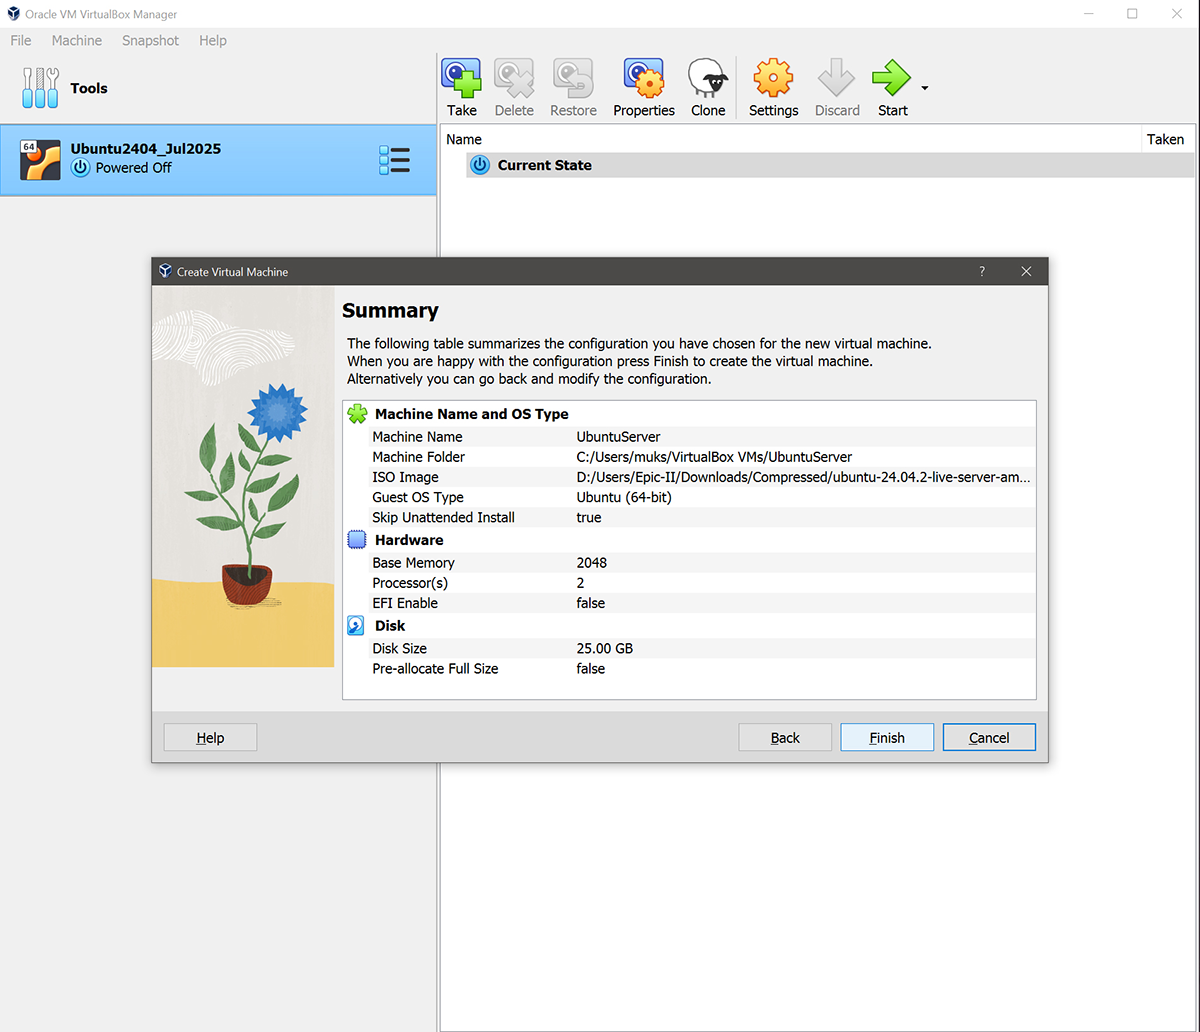
Click Next, then Next again, and finally Finish. Your new virtual machine is now ready.
Tip: If you ever want to tweak your resource allocation later, just right-click the VM > Settings > System, and adjust CPU and RAM from there.
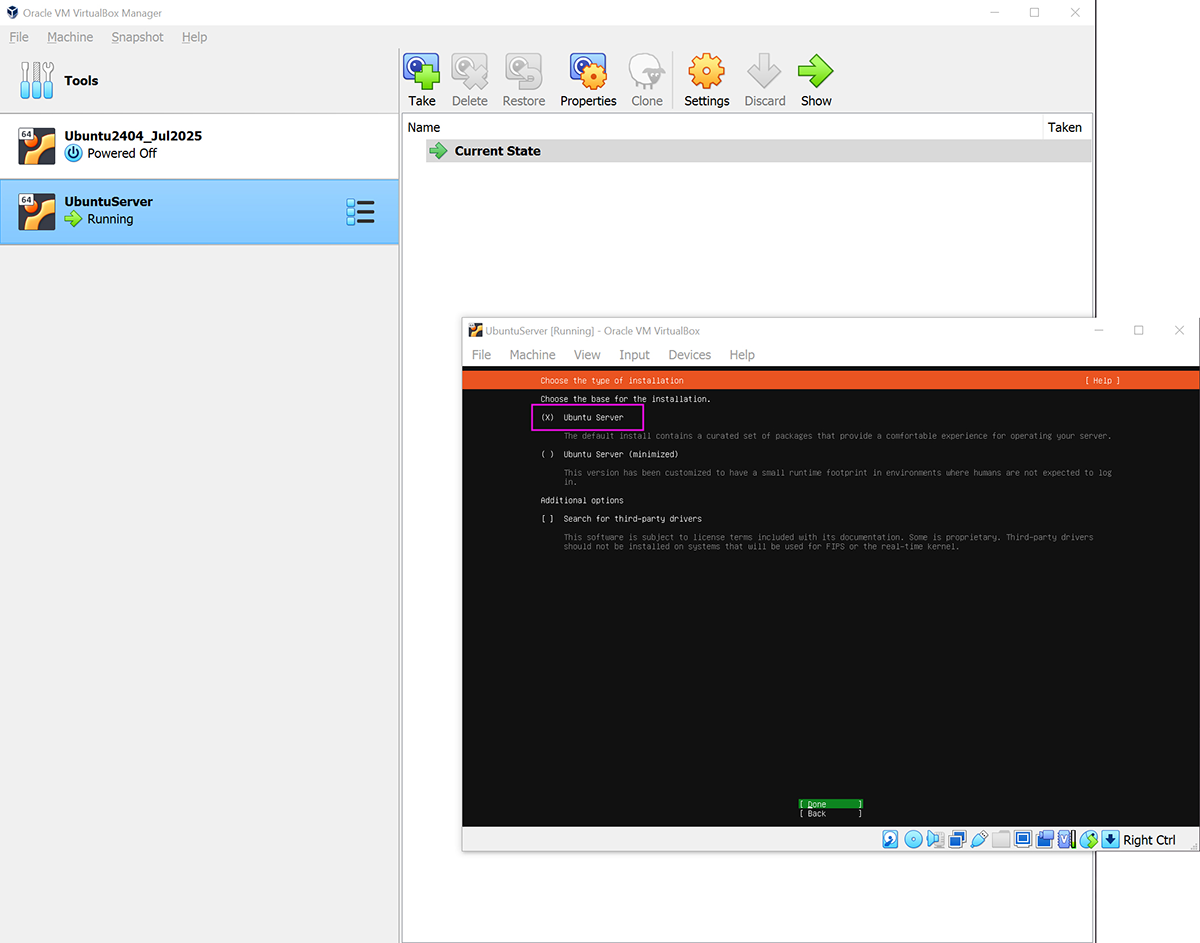
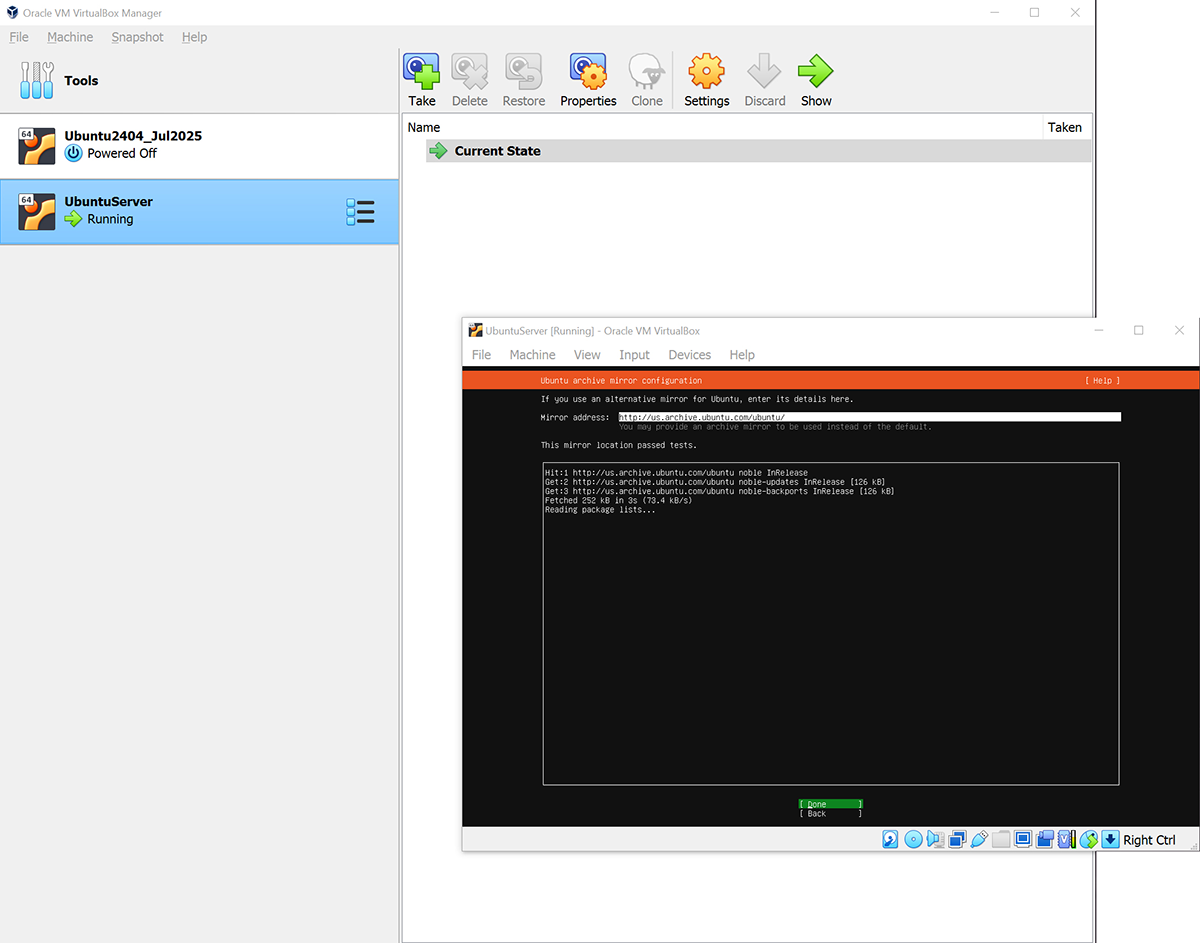
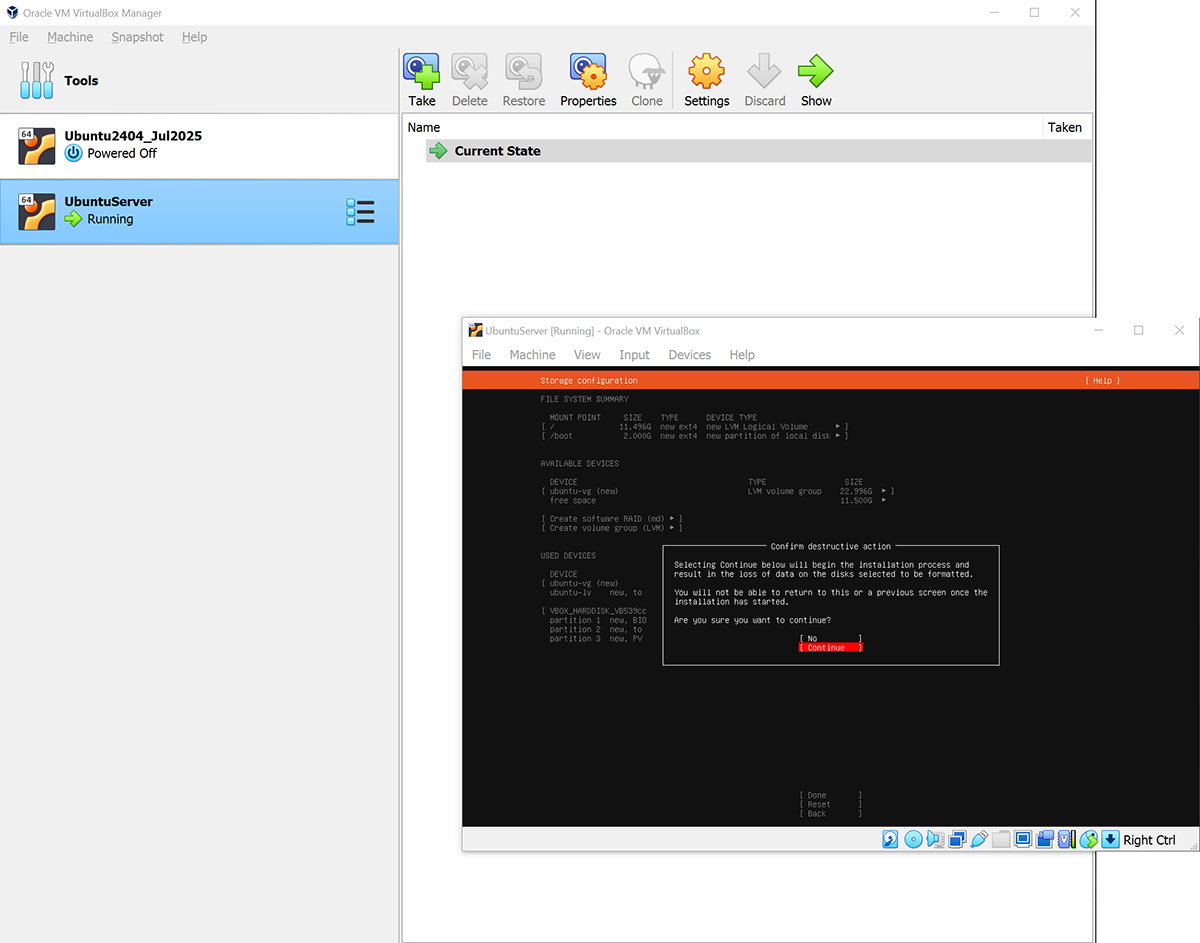
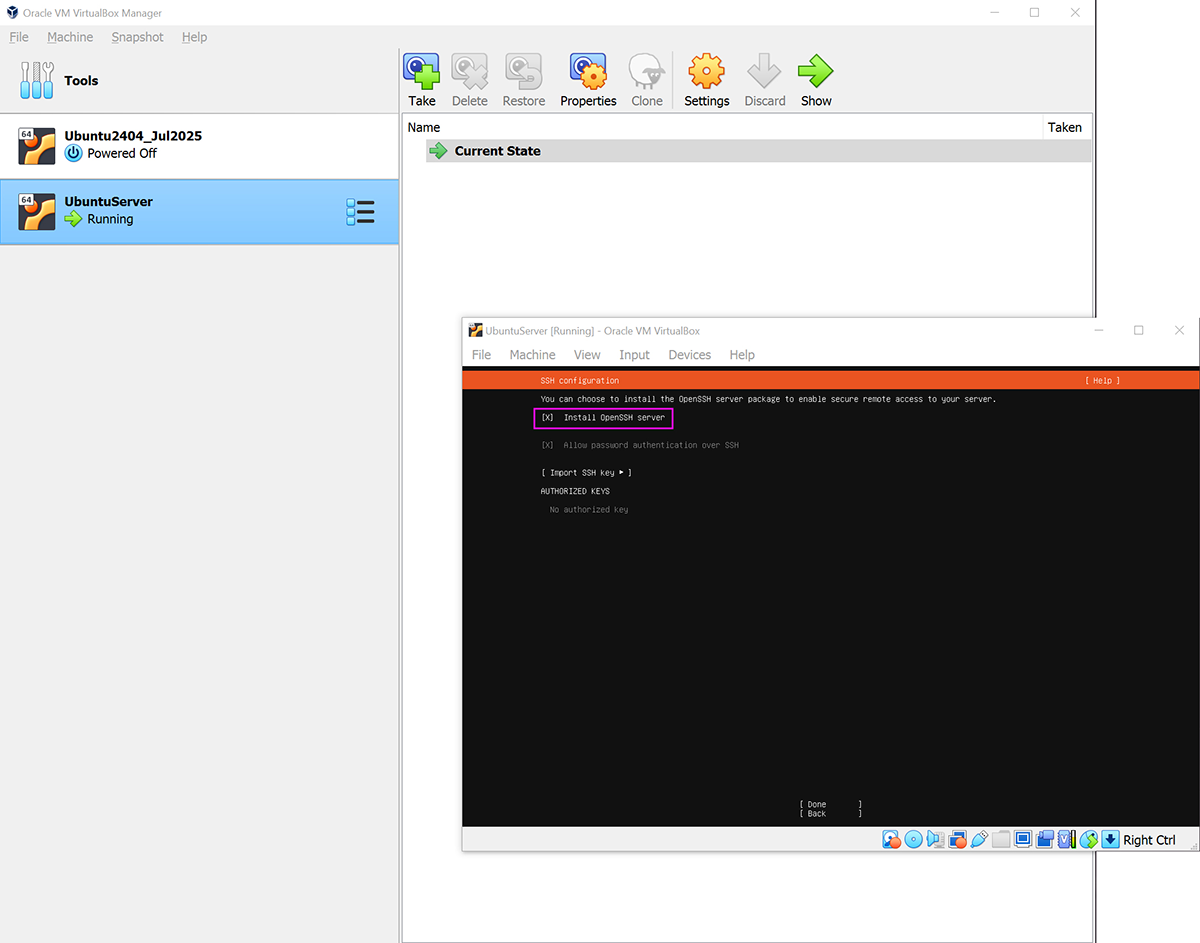
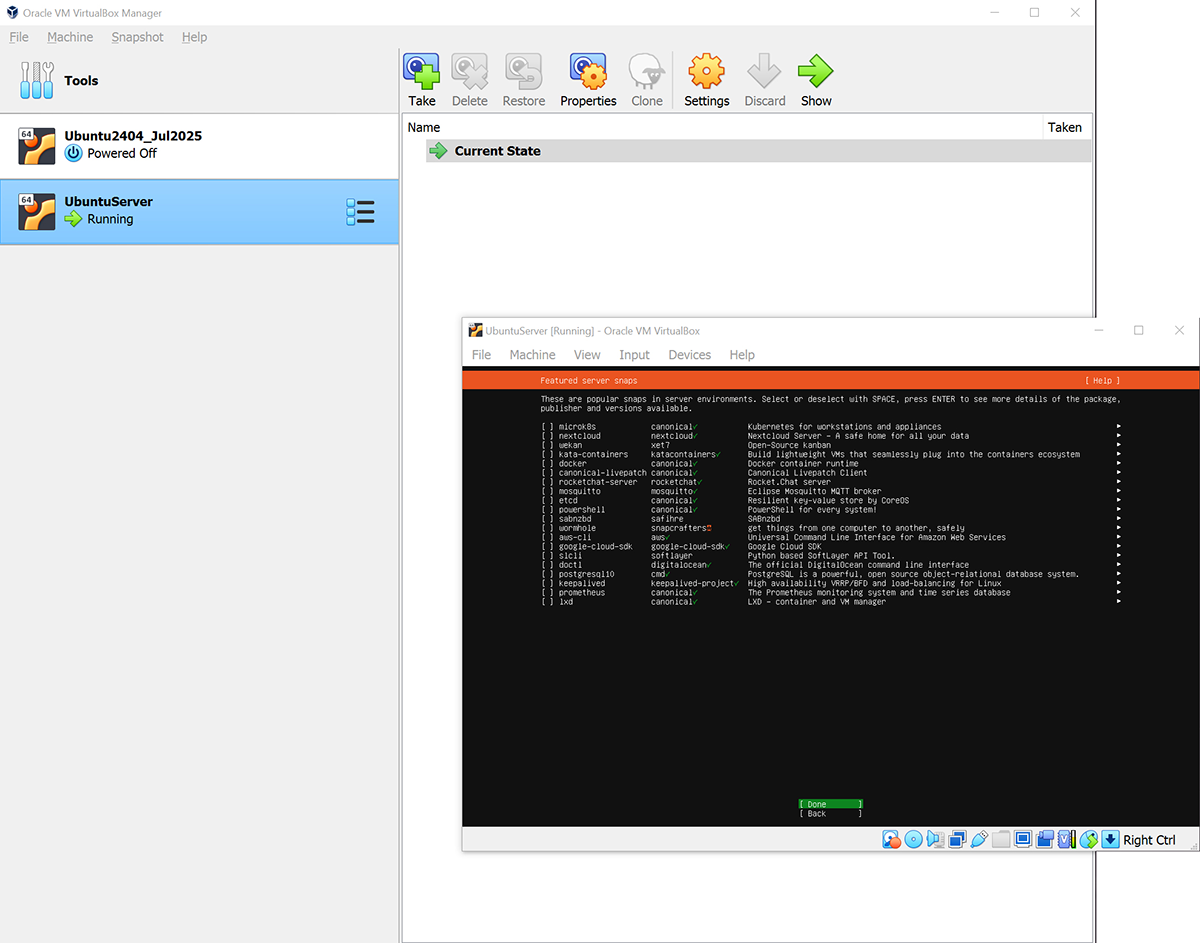
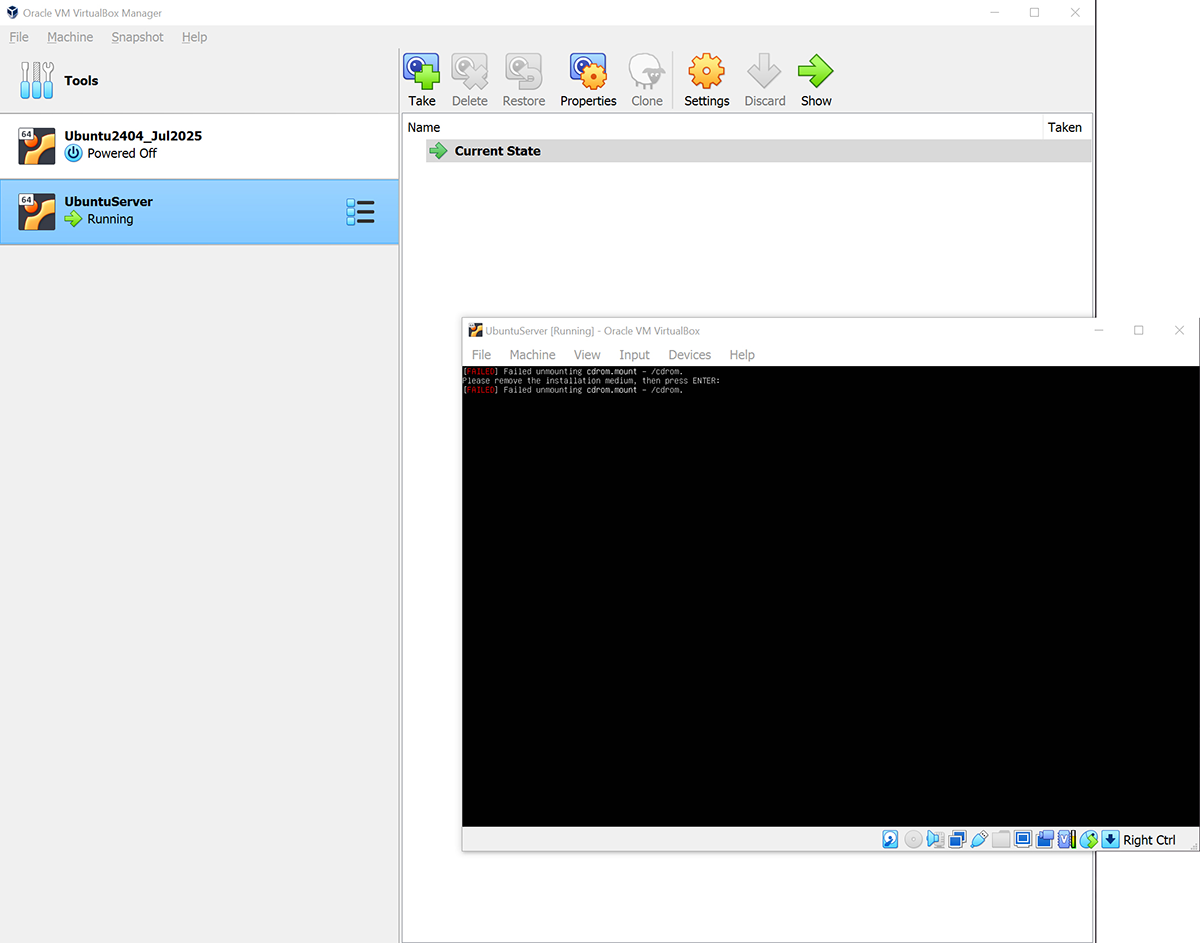
1.1.3 Installing Ubuntu Server
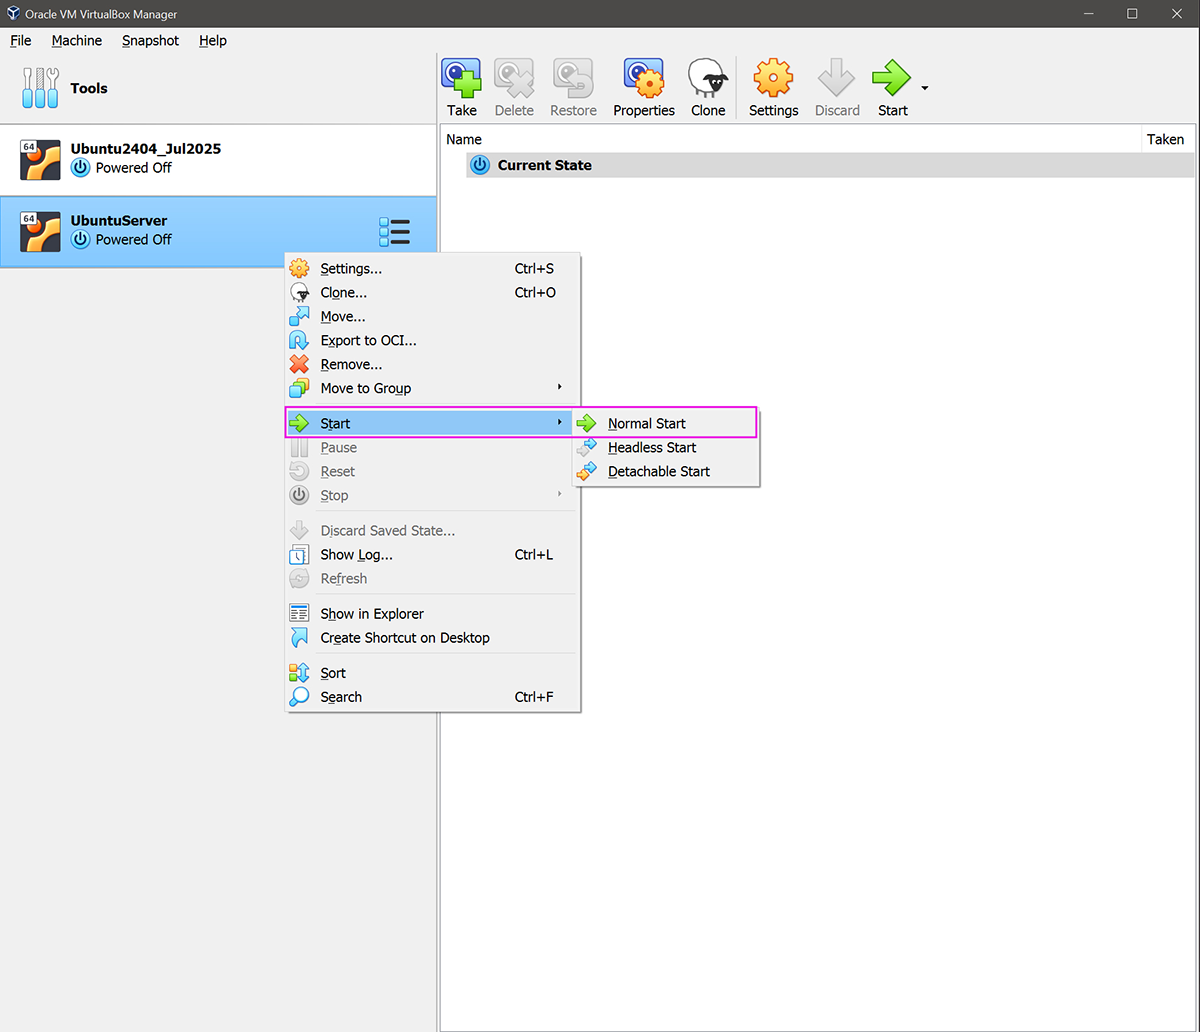
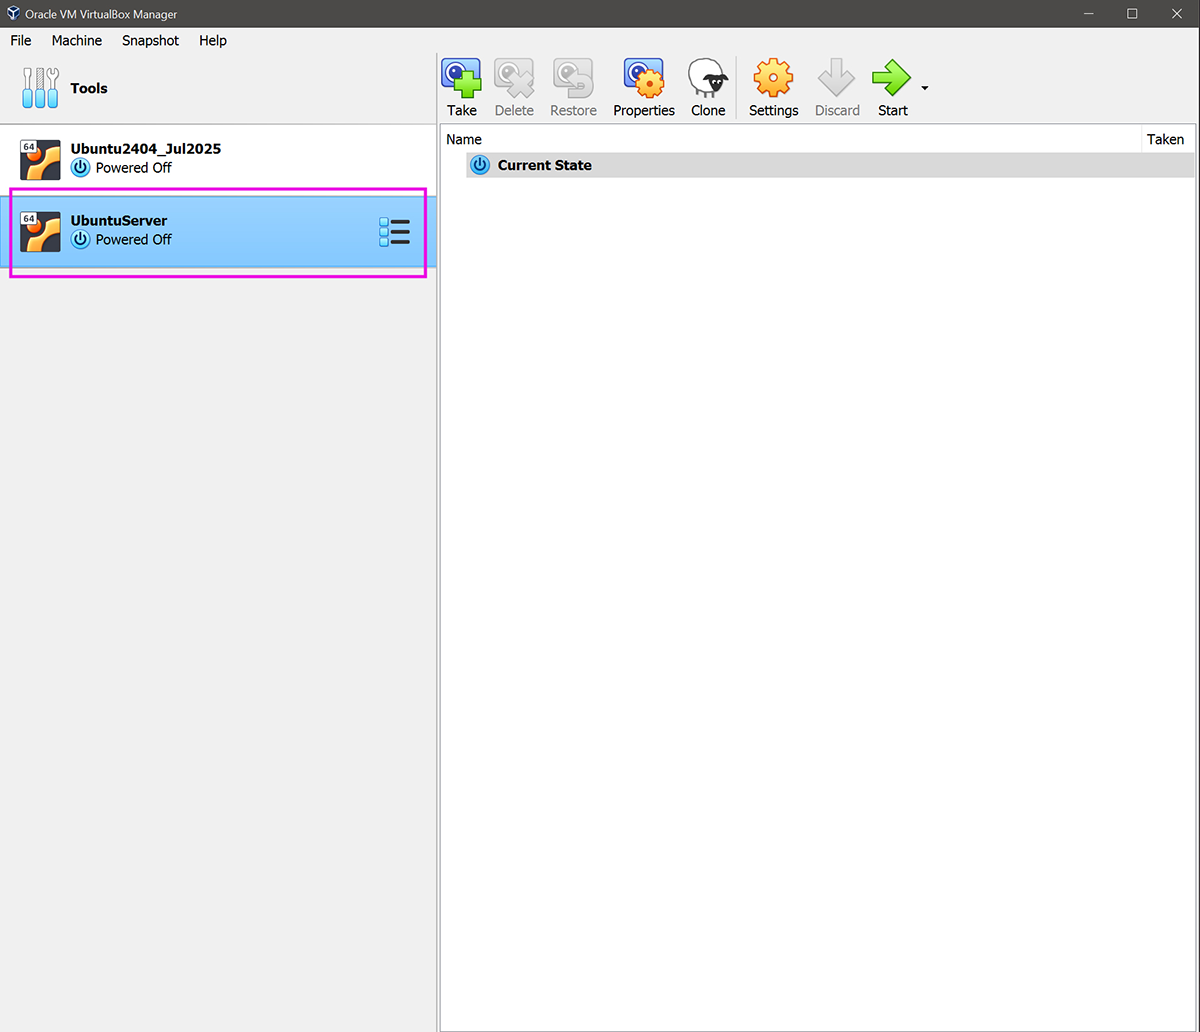
- Right-click on your virtual machine
- Select Start > Normal Start
I recommend using Normal Start here, as you’ll be interacting directly with the Ubuntu installer.
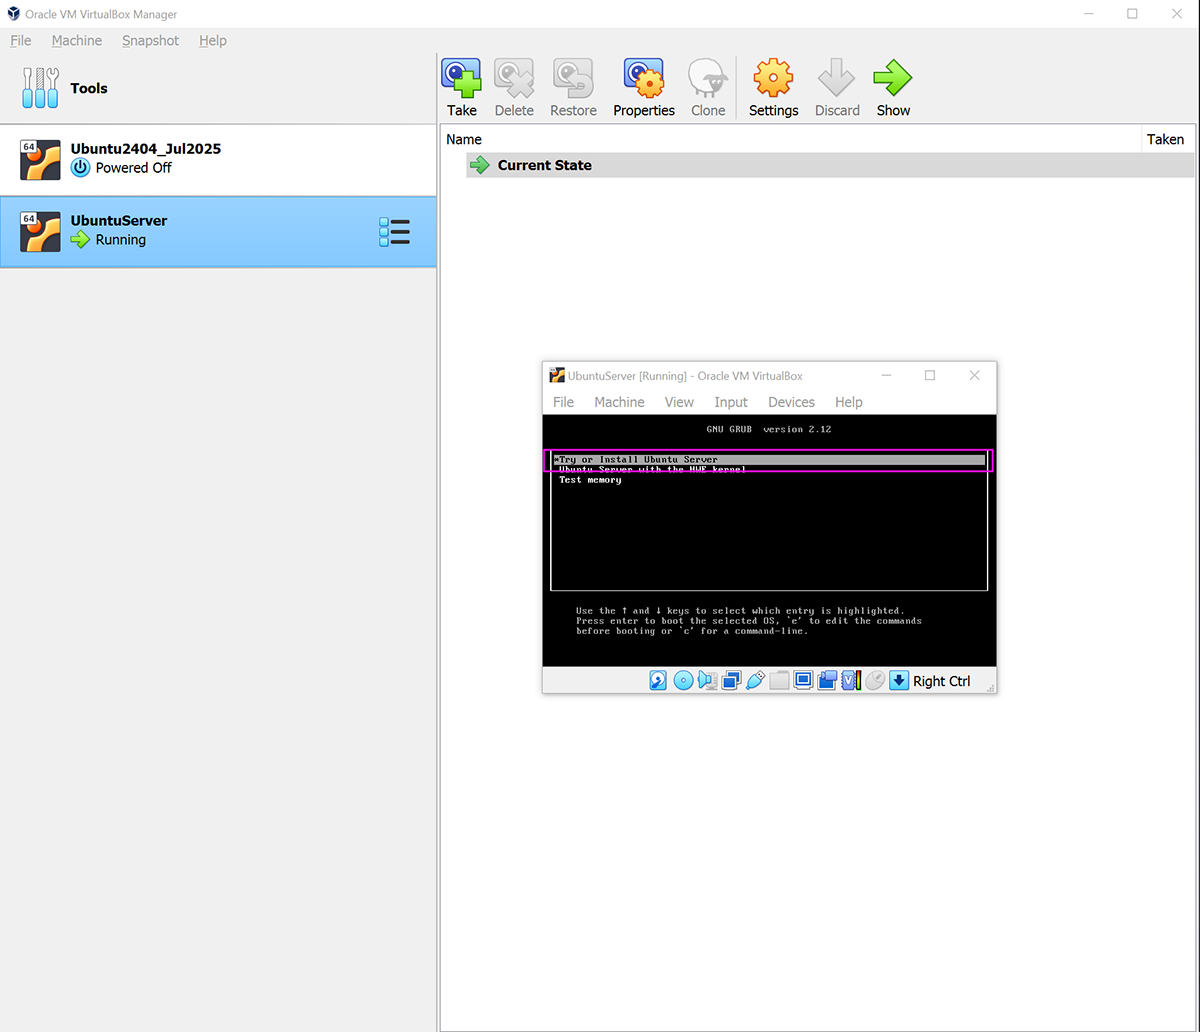
When the boot screen shows “Try or Install Ubuntu Server”, just hit Enter. Or do nothing—it’ll select it automatically after a few seconds.
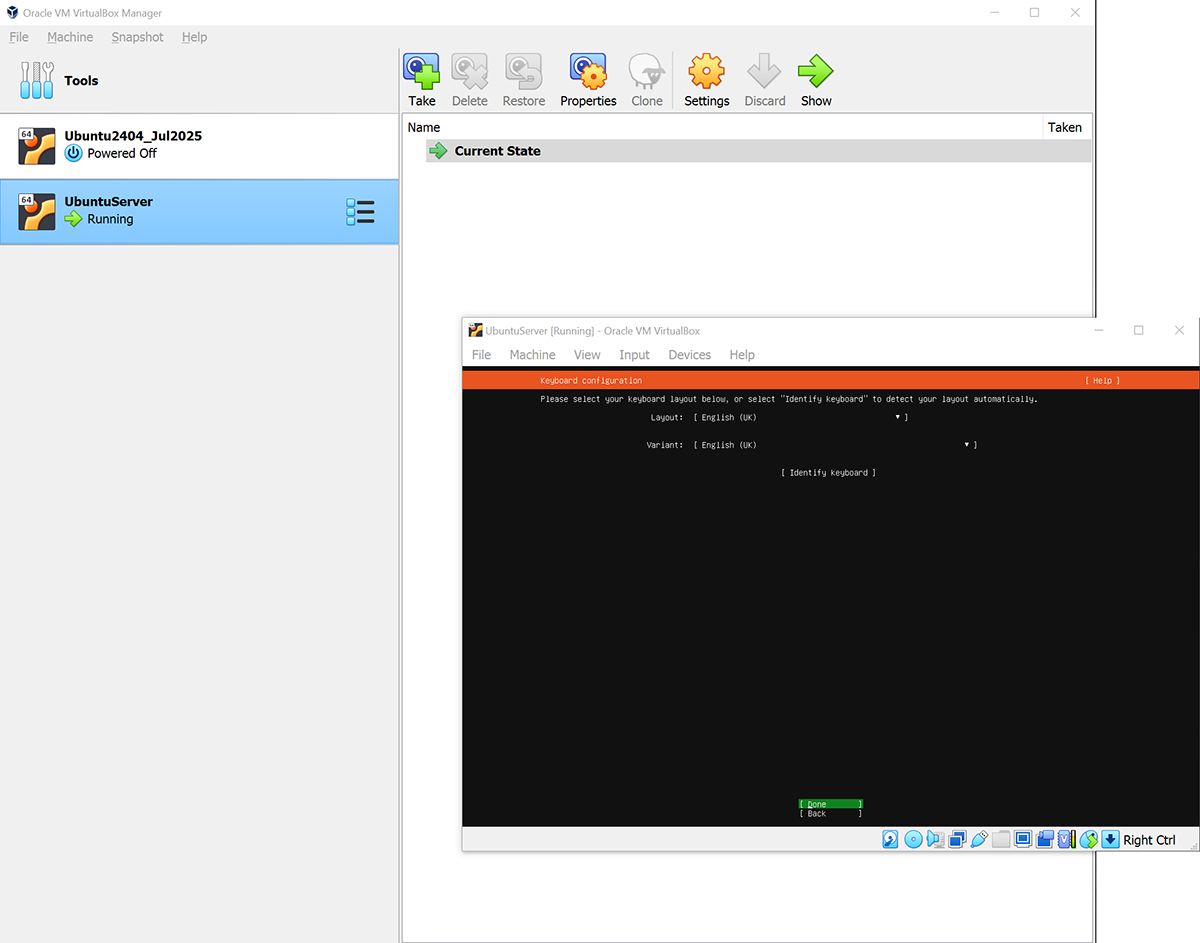
Use the arrow keys to navigate through the installer screens. It’s all text-based and lightweight, which is great for keeping things snappy.


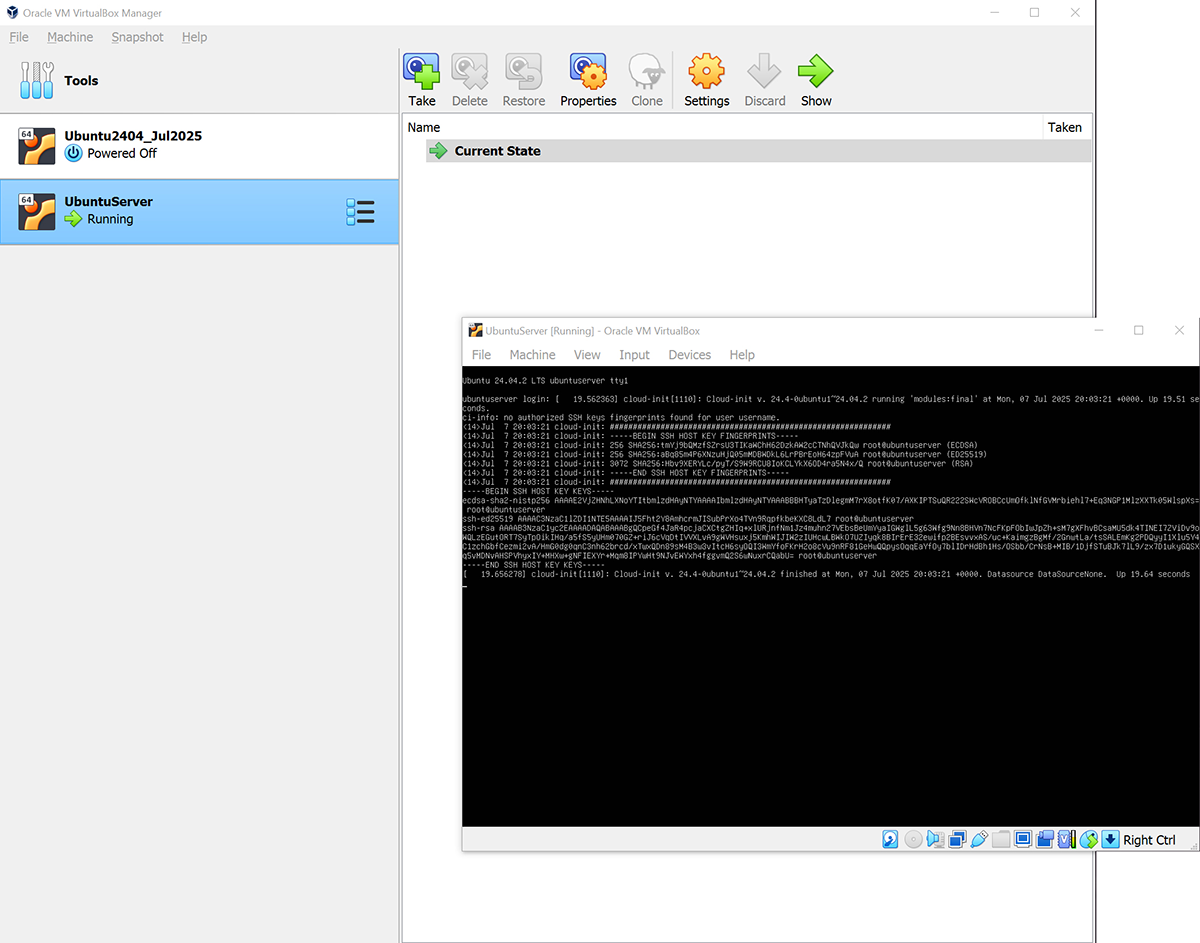
2. Building My Web Server
Now that I have my Ubuntu server up and running, it’s time to turn it into a web server so I can install WordPress, build websites, and do all that jazz.
You can interact with the server directly through VirtualBox by right-clicking the VM and selecting “Start > Normal Start”, which gives you a virtual terminal window. But honestly, I prefer to use PuTTY—a lightweight SSH client that makes life much easier (and gives you a real dev feel).
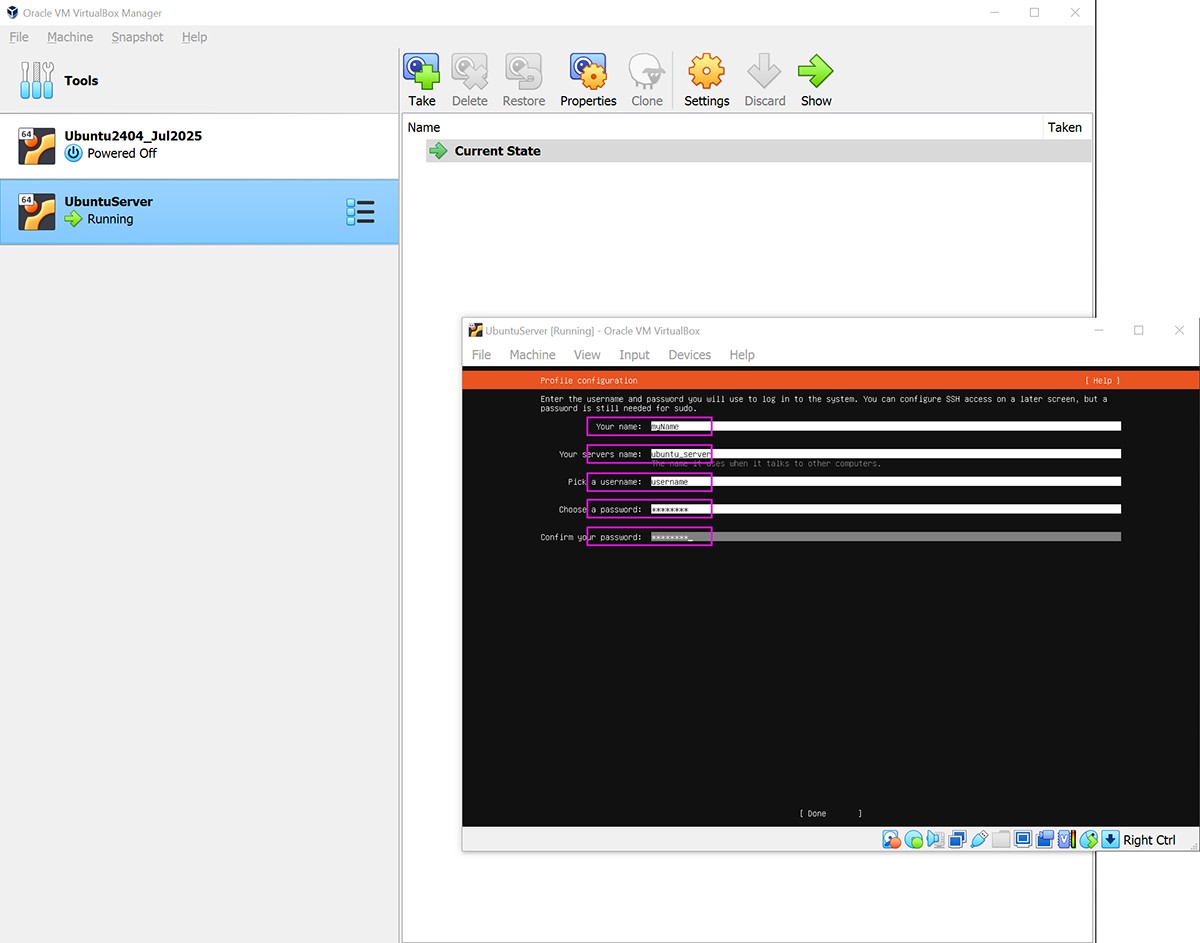
Since this is a local machine, I’m not too concerned with extra layers of security like additional users or password policies. I’m not hosting sensitive data, and I’d rather not create complications for myself by having to remember 17 different passwords. This setup is for development only—so we’re keeping things simple, clean, and efficient.
2.1 Setting Up Network Access to Your Virtual Server
Before we dive into connecting with PuTTY, there’s one important setup step: we need to configure the network settings of our virtual machine so we can access it via localhost—that’s 127.0.0.1 for those of you who speak IP.
To interact with it from outside VirtualBox (e.g., via PuTTY or a browser), we need to forward a couple of ports from your host machine to the virtual machine.
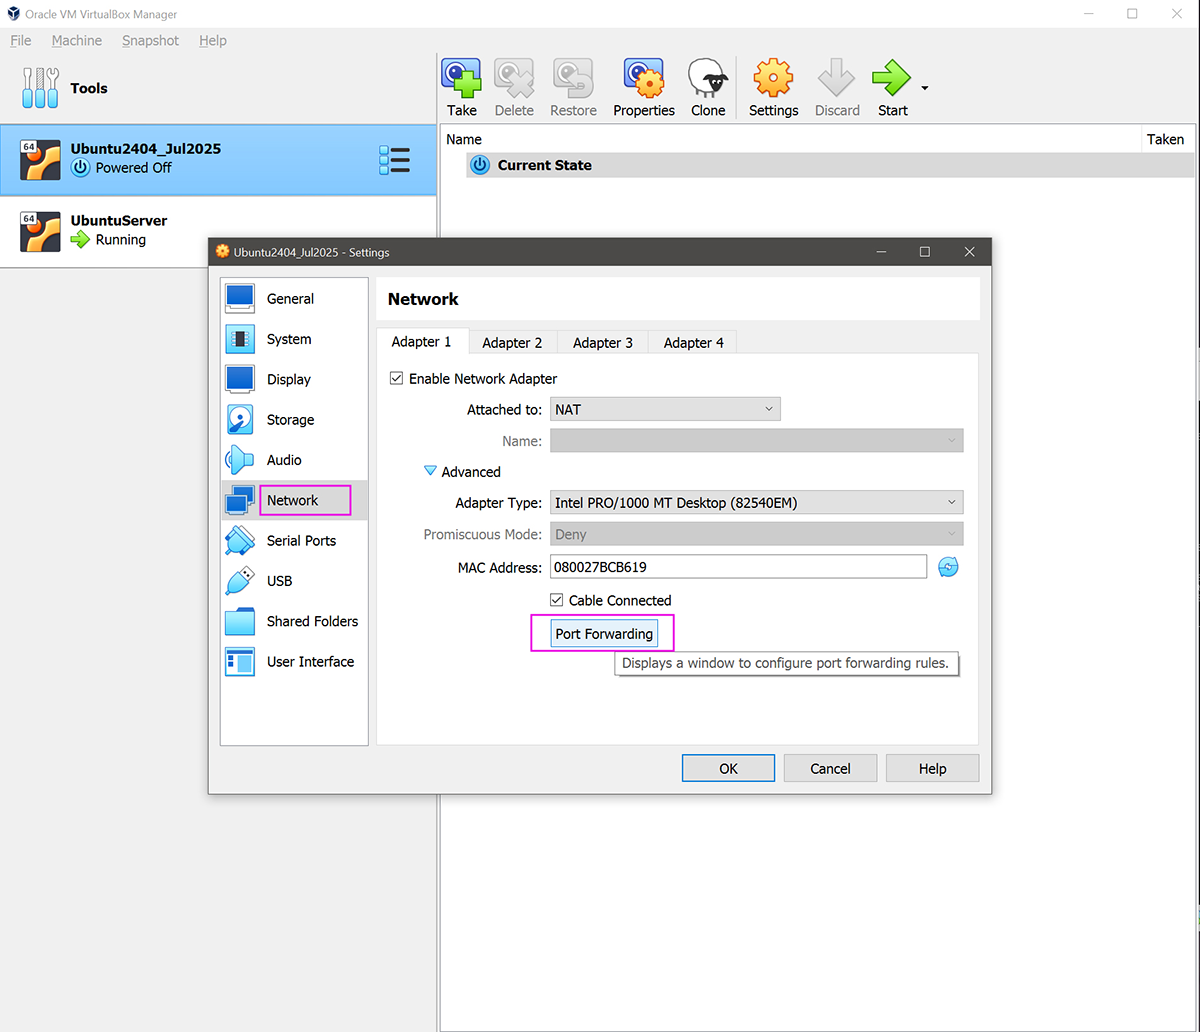
2.1.1 Here’s how to do it:
- Right-click on your server in VirtualBox.
- Select Settings > Network.
- Make sure Adapter 1 is attached to NAT (should be the default).
- Expand the Advanced section.
- Click Port Forwarding.
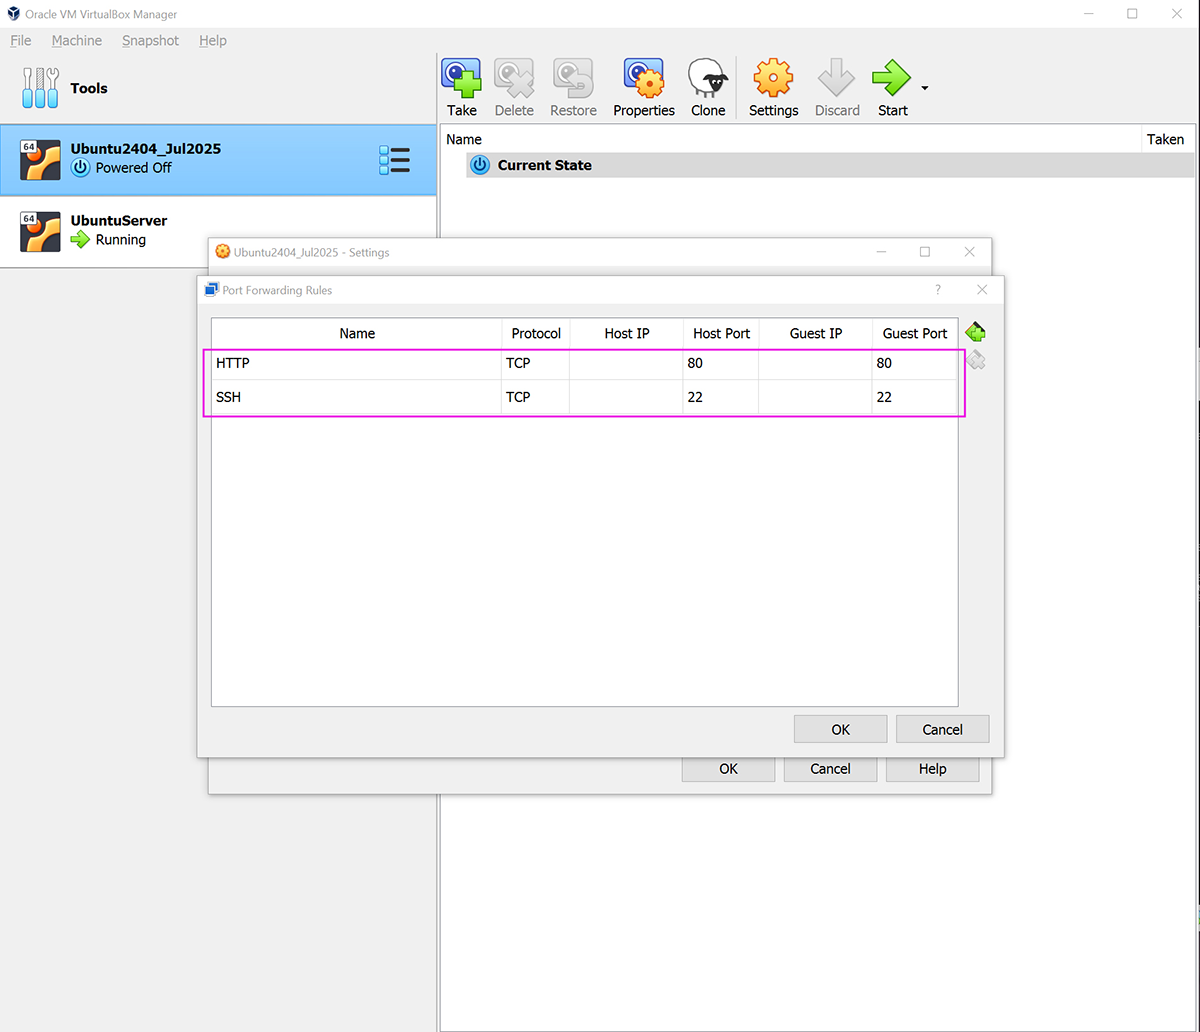
Now add two rules:
| Name | Protocol | Host IP | Host Port | Guest IP | Guest Port |
|---|---|---|---|---|---|
| SSH | TCP | 22 | 22 | ||
| HTTP | TCP | 80 | 80 |
What this does:
- Let’s you SSH into your virtual server using port 22.
- Let’s you visit your web server via your browser using
http://localhost(which maps to port 80 inside the VM).
Once this is set, your VM is ready to be reached from PuTTY.

2.2 Connecting to Your Server with PuTTY
Now that our virtual server is humming along in the background, it’s time to actually talk to it. For that, we’ll use a handy little tool called PuTTY—a lightweight SSH client that lets you connect to your virtual machine as if it were a remote server.
Step 1: Download & Install PuTTY
- Head over to the official PuTTY download page:
https://www.putty.org - Download the 64-bit Windows installer.
- Run the installer, accept all defaults, and let it install.
Done. That’s it.
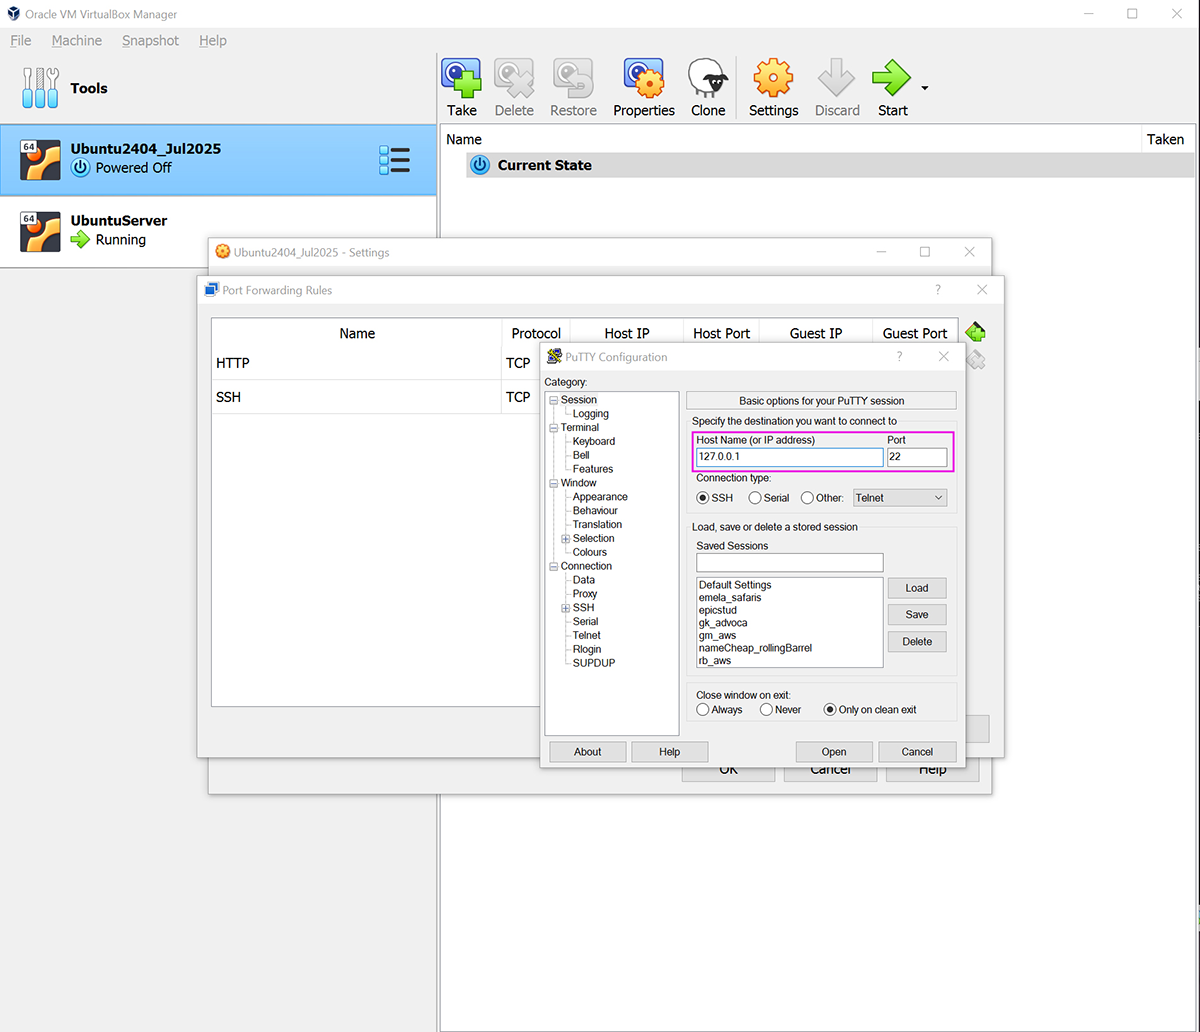
Step 2: Connect Using PuTTY
- Open PuTTY.
- In the Host Name (or IP address) field, type the IP address you just found (e.g.,
127.0.0.1). - Leave the port as
22(default for SSH). - Under Connection > SSH, make sure SSH is selected.
- (Optional) Under Session, give this connection a name and save it for future use by clicking Save.
- Click Open to connect.
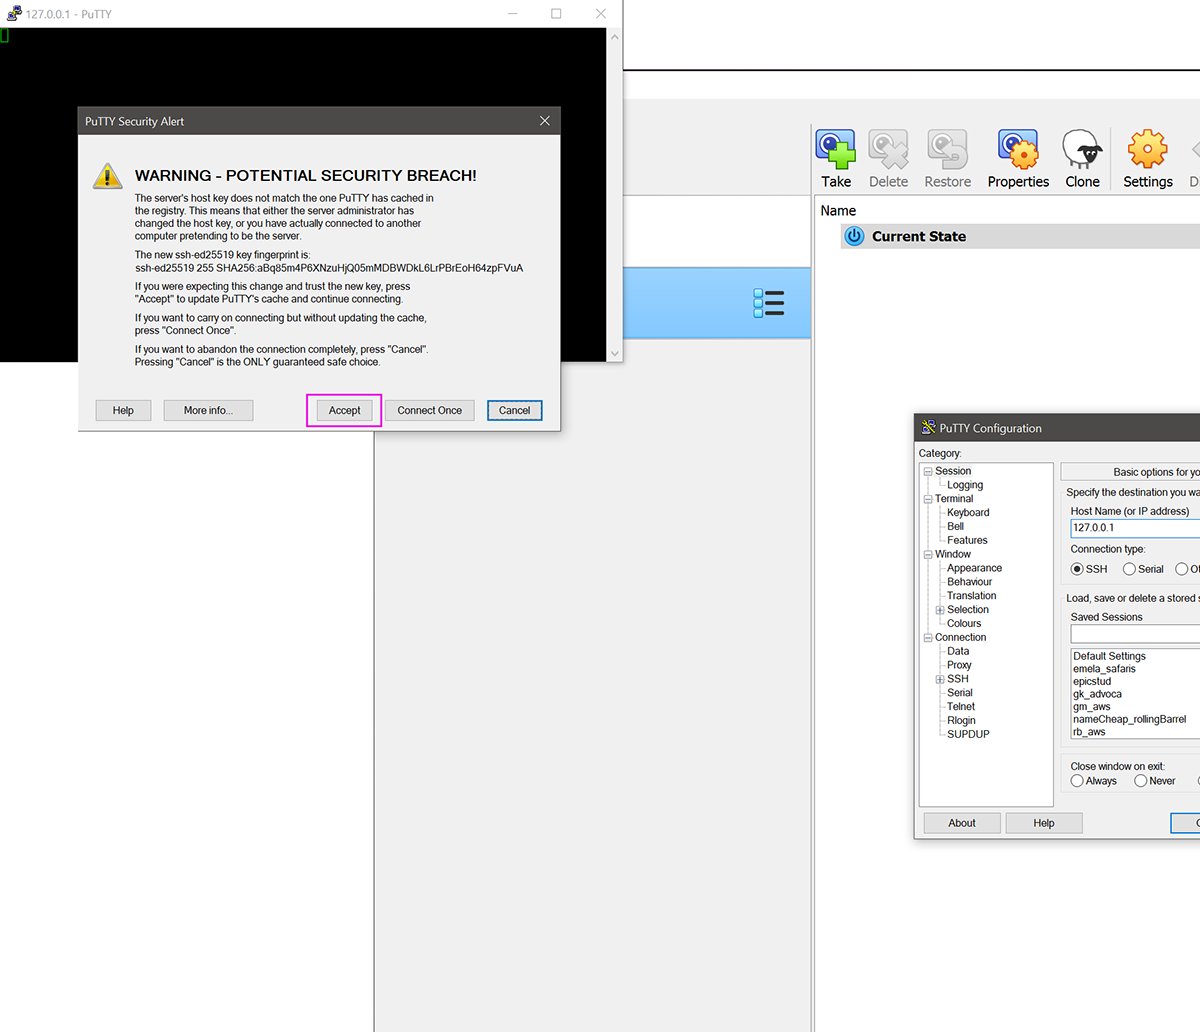
The first time, you’ll get a security warning about the server’s key fingerprint—just click Yes to trust it.
When prompted, log in using the username and password you set up during your Ubuntu Server installation.
And boom! You’re now inside your local server, talking to it like a pro via SSH—just like you would with in live production server on the cloud.
3. Creating the Web Server
Now that we can actually talk to our virtual machine, it’s time to turn this plain old Ubuntu box into a real web server—ready to serve websites, install WordPress, and cause us the occasional headache (in a good way). Let’s set things up step by step.
3.1 Allow SSH Connections
First, let’s open up SSH access in the server’s firewall so we can connect remotely (like we just did with PuTTY).
3.2: Turn on the Firewall
Next, enable the firewall so the rule actually takes effect:
You might get a warning that this could disrupt existing connections—that’s fine for our local setup.
3.3 Update Repositories
Always a good idea to update your package list before installing anything.
3.4 Install Apache
Now we install Apache, the web server software that’s going to serve up our pages:
3.5 Enable .htaccess in the Web Directory
By default, Apache doesn’t allow .htaccess files to override settings. Let’s fix that.
Edit the default Apache config:
Scroll to the bottom and add:
This lets us use .htaccess files in our project directories, which WordPress and other apps often rely on.
3.6 Set the Server Name
Edit the main Apache config file to set a ServerName, so Apache doesn’t whine about it later:
Add this line at the top or bottom (your choice):
⚠️ Quick tip: If you’re typing numbers and nothing is showing up—don’t use the number pad. Use the number keys above the letters. Yes, it’s weird.
3.7 Test Apache Configuration
Let’s make sure you didn’t fat-finger anything in the config files:
If you see Syntax OK, you’re golden.
3.8 Enable URL Rewriting
WordPress and many frameworks rely on clean URLs, so let’s enable Apache’s rewrite module:
3.9 Restart Apache
Final step: restart Apache so all your changes take effect:
Also, don’t forget to allow full Apache traffic through the firewall (HTTP and HTTPS):
At this point, you should be able to visit your server in a browser at:
…and see the “Apache2 Ubuntu Default Page” staring back at you. If you see it, congrats—all is kosher.

4. Installing MySQL (Yes, the Database Bit)
Before anything can be stored—posts, users, cat memes—we need a database. That’s where MySQL comes in. It’s the workhorse behind many CMS platforms, including WordPress.
- But first, a little disclaimer:
- Since this is a local environment, and as mentioned earlier, I don’t need the hustle of passwords and user hardening (whatever that is), I’ll be skipping the
mysql_secure_installationstep.In the past, this process has brought me more headache than it’s worth—especially in live environments where one misstep with a password or permission can lock you out entirely. These days, when I’m deploying something serious, I prefer to use prebuilt templates offered by AWS. These setups come pre-configured with all the secure defaults, database users, and LAMP stack components ready to go—saving me time and avoiding the rabbit hole of configuration errors
4.1 Install MySQL
You do that with:
That’s it. No setup wizard, no extra questions — it installs and starts the MySQL service automatically.
4.2 Verify MySQL is Running
You can confirm that the MySQL service is up and running with:
You should see something like:
If it isn’t active, try starting it manually:
You can also try logging in to make sure everything’s working:
You should see the MySQL shell prompt:
If you get in, you’re good to go. You can exit the shell by typing:
MySQL is now installed and ready to serve. We’ll come back to it later when it’s time to set up a database and user for WordPress.
Note on the Root Password
In some newer versions of MySQL, the default authentication plugin doesn’t always play nice with certain apps (like PHPMyAdmin or WordPress, which is why I am doing this in the first place). If you find yourself going in circles, try switching the root user to the mysql_native_password plugin:
Infact its probaly a good idea, but you can used a simple password, like password!
5. Installing PHP (Because Apache Needs a Brain)
So far, we’ve got Apache (the waiter) and MySQL (the kitchen), but we still need a brain to process requests and serve dynamic content. That’s where PHP comes in.
Let’s install it, along with the usual suspects—modules and extensions you’ll most likely need for stuff like WordPress, phpMyAdmin, and other modern web apps.
5.1 Install PHP and Common Extensions
To install all commonly used PHP modules for the latest available PHP version (e.g. PHP 8.3 or whatever is latest on your system), you’ll first want to find out the correct PHP version, then install its modules.
Here’s how to update your command dynamically for the latest PHP version available from your OS or a PPA like ondrej/php.
5.1.1 Add PHP PPA (for Ubuntu)
This ensures you get the latest PHP versions:
5.2 Install Latest PHP with All Common Modules
Now run this (replace php8.3 with your desired/latest version — check with apt search php if needed):
Notes
- This covers all major PHP extensions used in web apps like WordPress, Laravel, Drupal, Symfony, Magento, etc.
- You can verify the installed modules using:
To make sure Apache is using the right PHP version, you may need to run:
5.3 Update PHP 8.3 Settings with sed and Restart Apache
5.3.1 Edit dir.conf to prioritize index.php
This tells Apache to load index.php before index.html when browsing directories.
Change this:
To this:
Then save (CTRL+O, ENTER, then CTRL+X) and restart Apache:
5.3.2 Edit php.ini to adjust PHP runtime settings
Search (CTRL+W) for each of the following and edit:
These settings help increase PHP performance and file-handling capacity for large apps or scripts like phpMyAdmin, WordPress, or Laravel.
PHP Settings Summary
| Setting | Description | Your Setting |
|---|---|---|
short_open_tag |
Enables <? ?> short tags (off by default) |
On |
memory_limit |
Maximum memory PHP scripts can consume | 4G |
upload_max_filesize |
Max size of uploaded files via forms | 256M |
max_execution_time |
Maximum time a script is allowed to run (in seconds) | 18000 |
realpath_cache_ttl |
Time-to-live for the path resolution cache (in seconds) | 7200 |
realpath_cache_size |
Size of memory used for the realpath cache | 10M |
Then save and restart Apache.
5.3.3 Make the Same Changes via sed in One Line Each
If you prefer command-line automation (e.g., in scripts), use sed to search and replace lines directly:
6.0 Install phpMyAdmin (Not Optional… Unless You Really Love SQL Commands)
Let’s be honest—unless you’re some kind of command-line wizard who lives to type out SQL queries from memory, installing phpMyAdmin is not optional. It’s the difference between fumbling through your database with a flashlight… and walking in with the lights on, a map, and maybe a coffee.
phpMyAdmin gives you a clean web interface to view, edit, and manage your databases with clicks, dropdowns, and forms. And yes, it even color-codes things for your fragile, sleep-deprived brain.
6.1 Installing phpMyAdmin (and friends)
Run this command to install phpMyAdmin and a couple of PHP extensions it needs:
Important:
During installation, you’ll be prompted to choose a web server.
Make sure to select Apache2 using the Spacebar, then hit Enter to proceed.
You’ll also be asked whether to configure a database using dbconfig-common.Go ahead and say Yes. This will automatically create a phpMyAdmin-specific user and ask you to set a password.
I just used a simple password here—same as I did for MySQL root—because again, this is a local machine, not Fort Knox. Keep it chill.
Once that’s done, restart Apache to apply everything:
6.2 Test phpMyAdmin
To test it out, open your browser and visit:
You should see the phpMyAdmin login page.
Login using the root user or the phpMyAdmin user you just created, and you’ll be welcomed into the warm embrace of a visual MySQL dashboard.
7.0 And we’re done…
Whew! That was a journey—from creating a virtual machine and setting up a server, to installing Apache, MySQL, PHP, and phpMyAdmin. A long post, no doubt… and a bit of a process, sure. But hopefully, everything was explained simply enough to follow along without too many head scratches.
Now that your LAMP stack is fully up and running, you can go ahead and install WordPress (or Magento, if you’re still feeling chaotic). It’s all downhill from here.
Will I write a post about installing WordPress? Maybe.
Will I lose my WordPress site again in a few months and be forced to reinstall it from scratch? Also maybe.
But let’s be honest—it’s been done so many times, by so many people, that there are already dozens of step-by-step guides out there doing a much better job than I probably will.
So for now, pat yourself on the back. You’ve built your own local server, and your future self just might thank you for it.
Onward to the next inevitable disaster!
[addtoany]
Recent
-
1
-
2
-
3
-
4
-
5
-
6
-
7
-
8
-
9
-
10
