
Python in Mari – Part 1: Automating Some Stuff (Without Losing Your Mind)

I haven’t used Mari in a long time—mostly because it’s a resource hog. But when it comes to painting textures, Mari is amazing. My general workflow is procedural first, hand-paint later (except for faces). If I can achieve a result procedurally, I save time and can generate more reusable materials.
Procedural texturing in Mari usually means working with files—importing textures via Tile nodes, Triplanar nodes, or Paint nodes. This is powerful, but also a little messy. If you’ve used Tile nodes, you know the problem: You quickly lose track of which file belongs to which node.
Renaming each node manually? Painful.
So, my mission:
- Write Python code in Mari that automatically detects new Tile nodes once an image is dropped into the node editor
- Grabs the filename of the imported texture and renames the node
- Add a Grade and HSV node for quick adjustments
As a bonus, I also want images added to the Image Manager to auto-assign the right color space—because doing that manually is just busywork.
For this post I will focus on setting up Python Environment so I can work on my code outside of Mari, say in VS Code.
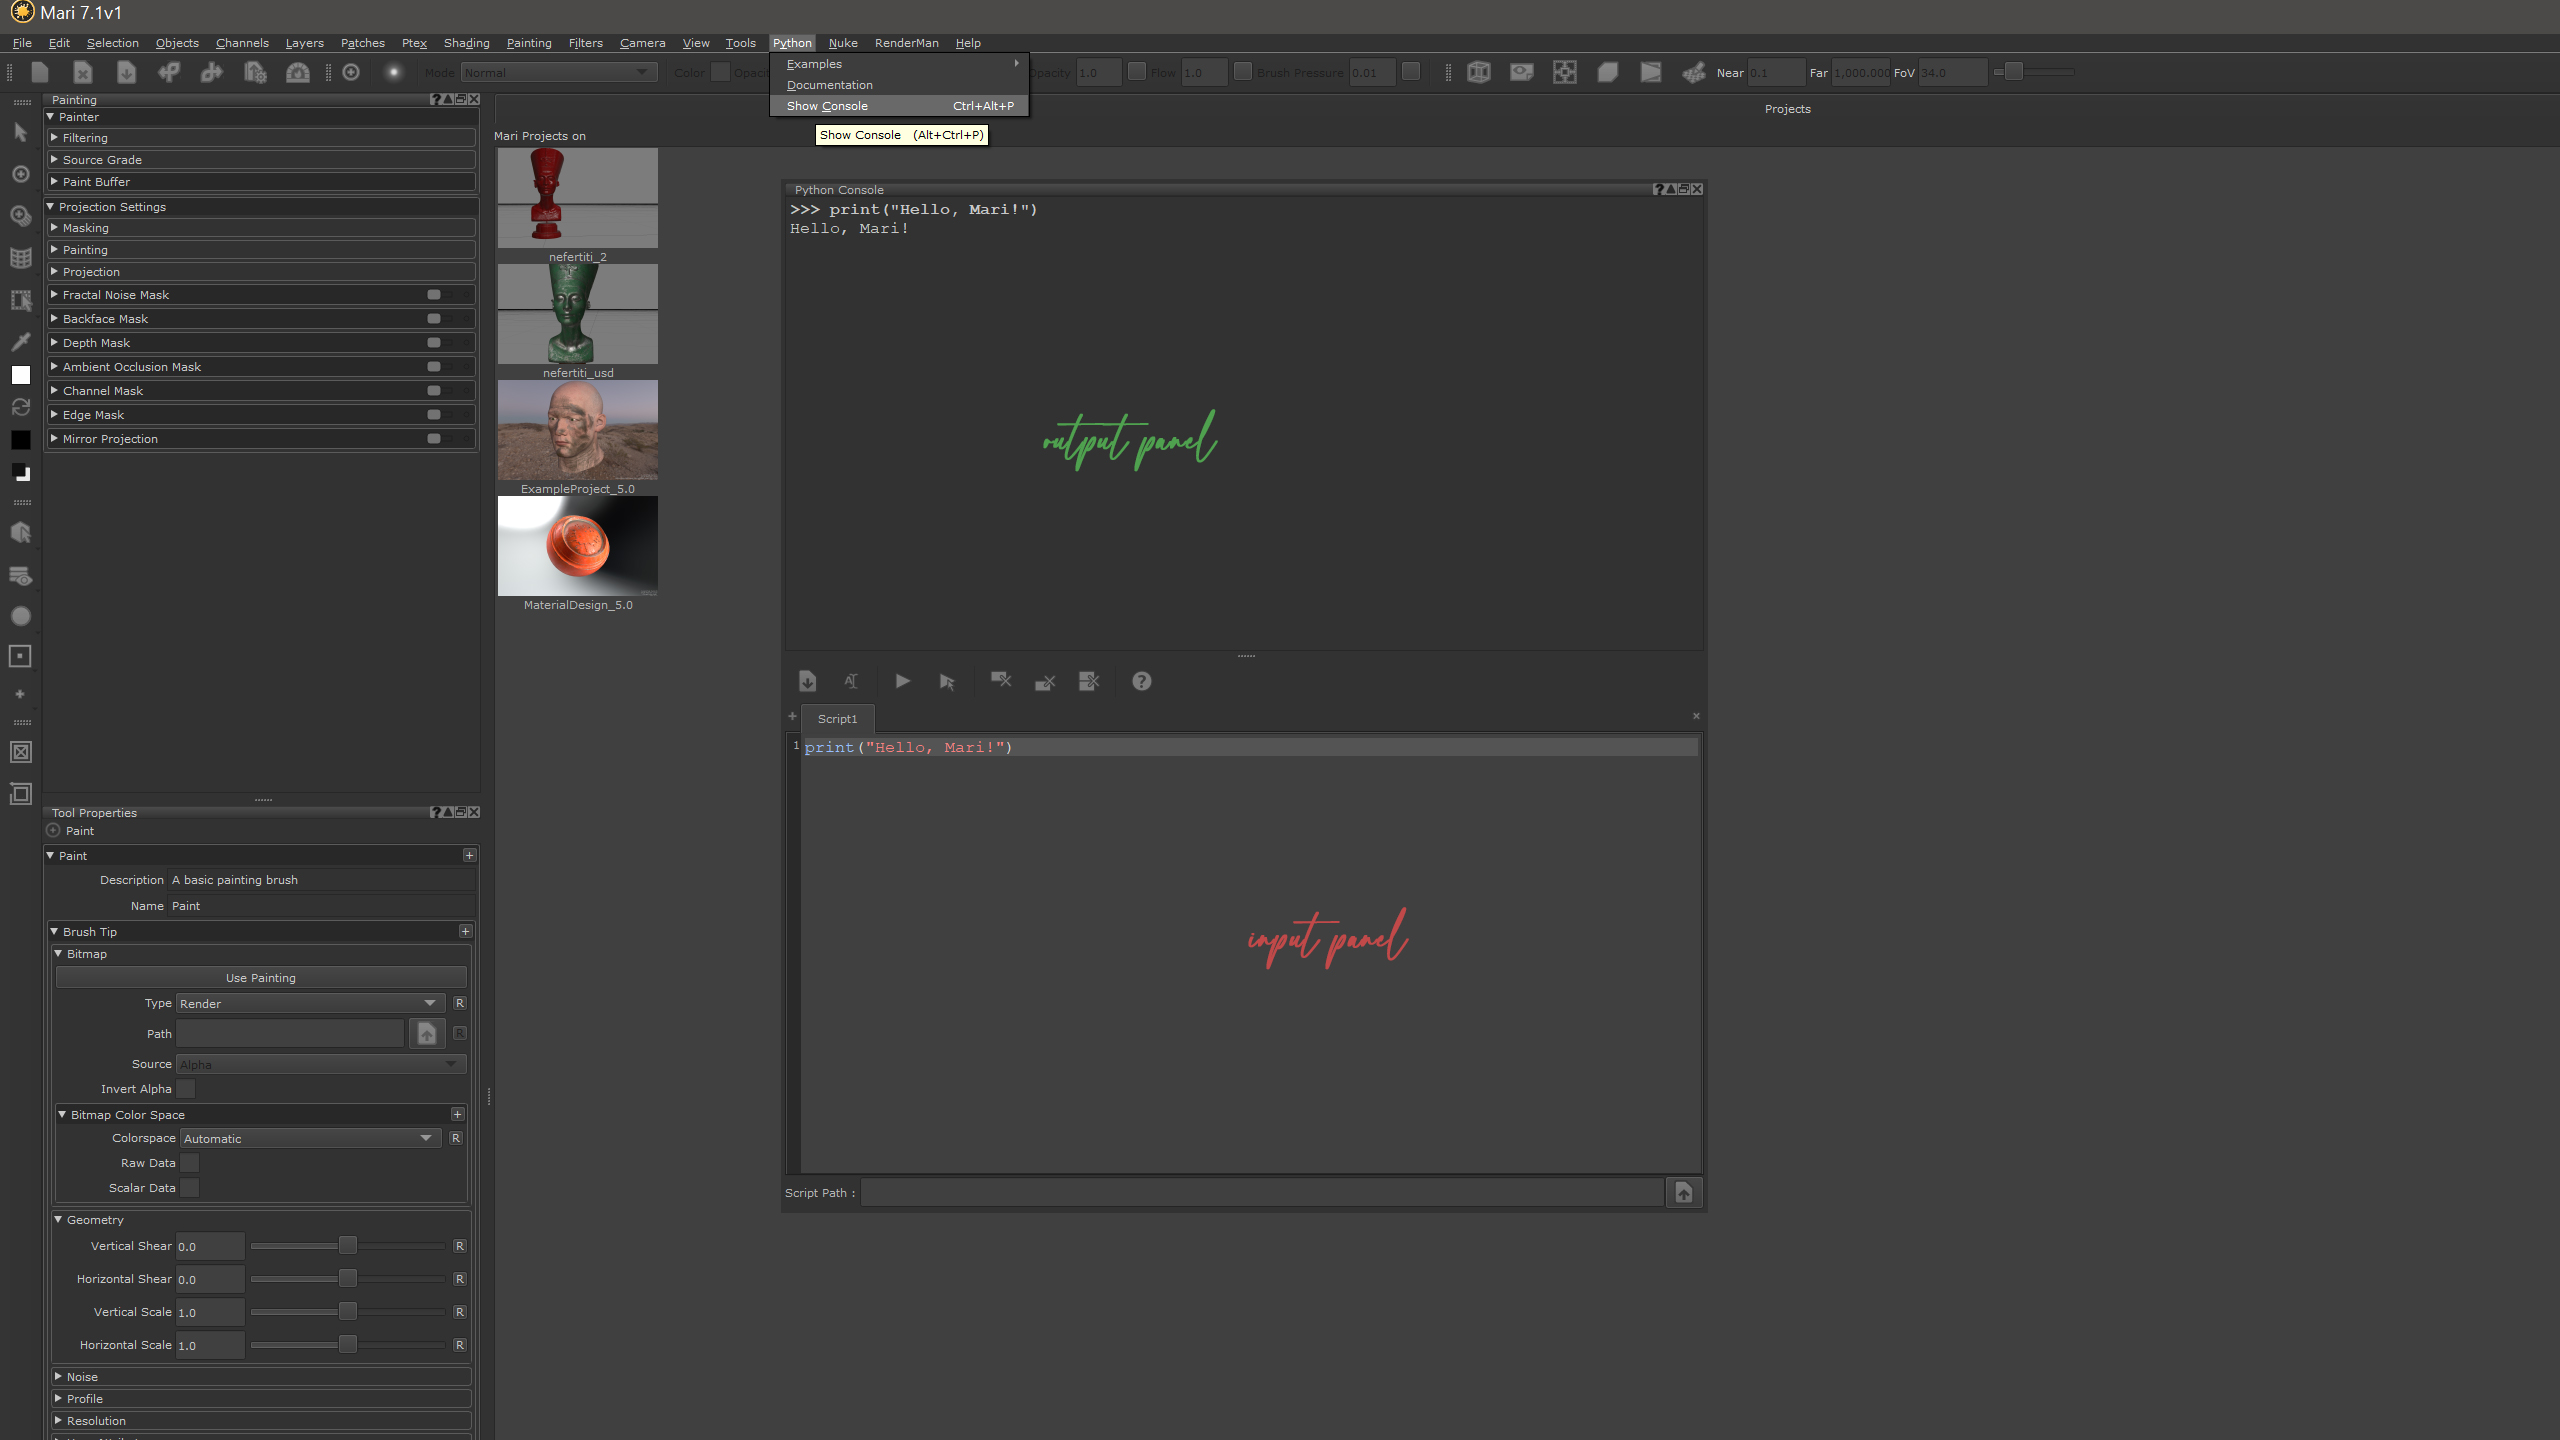
1. Hello, Mari!
Before automating anything, I wanted to confirm I could trigger actions in Mari via Python. The simplest (and most obvious) way is through the Python Console:
Main Menu → Python → Console
I know it’s stating the obvious, the python console window has an input and output panel.
In the input panel type:
And the output panel says:
Simple!
But let’s complicate things (because why not?).
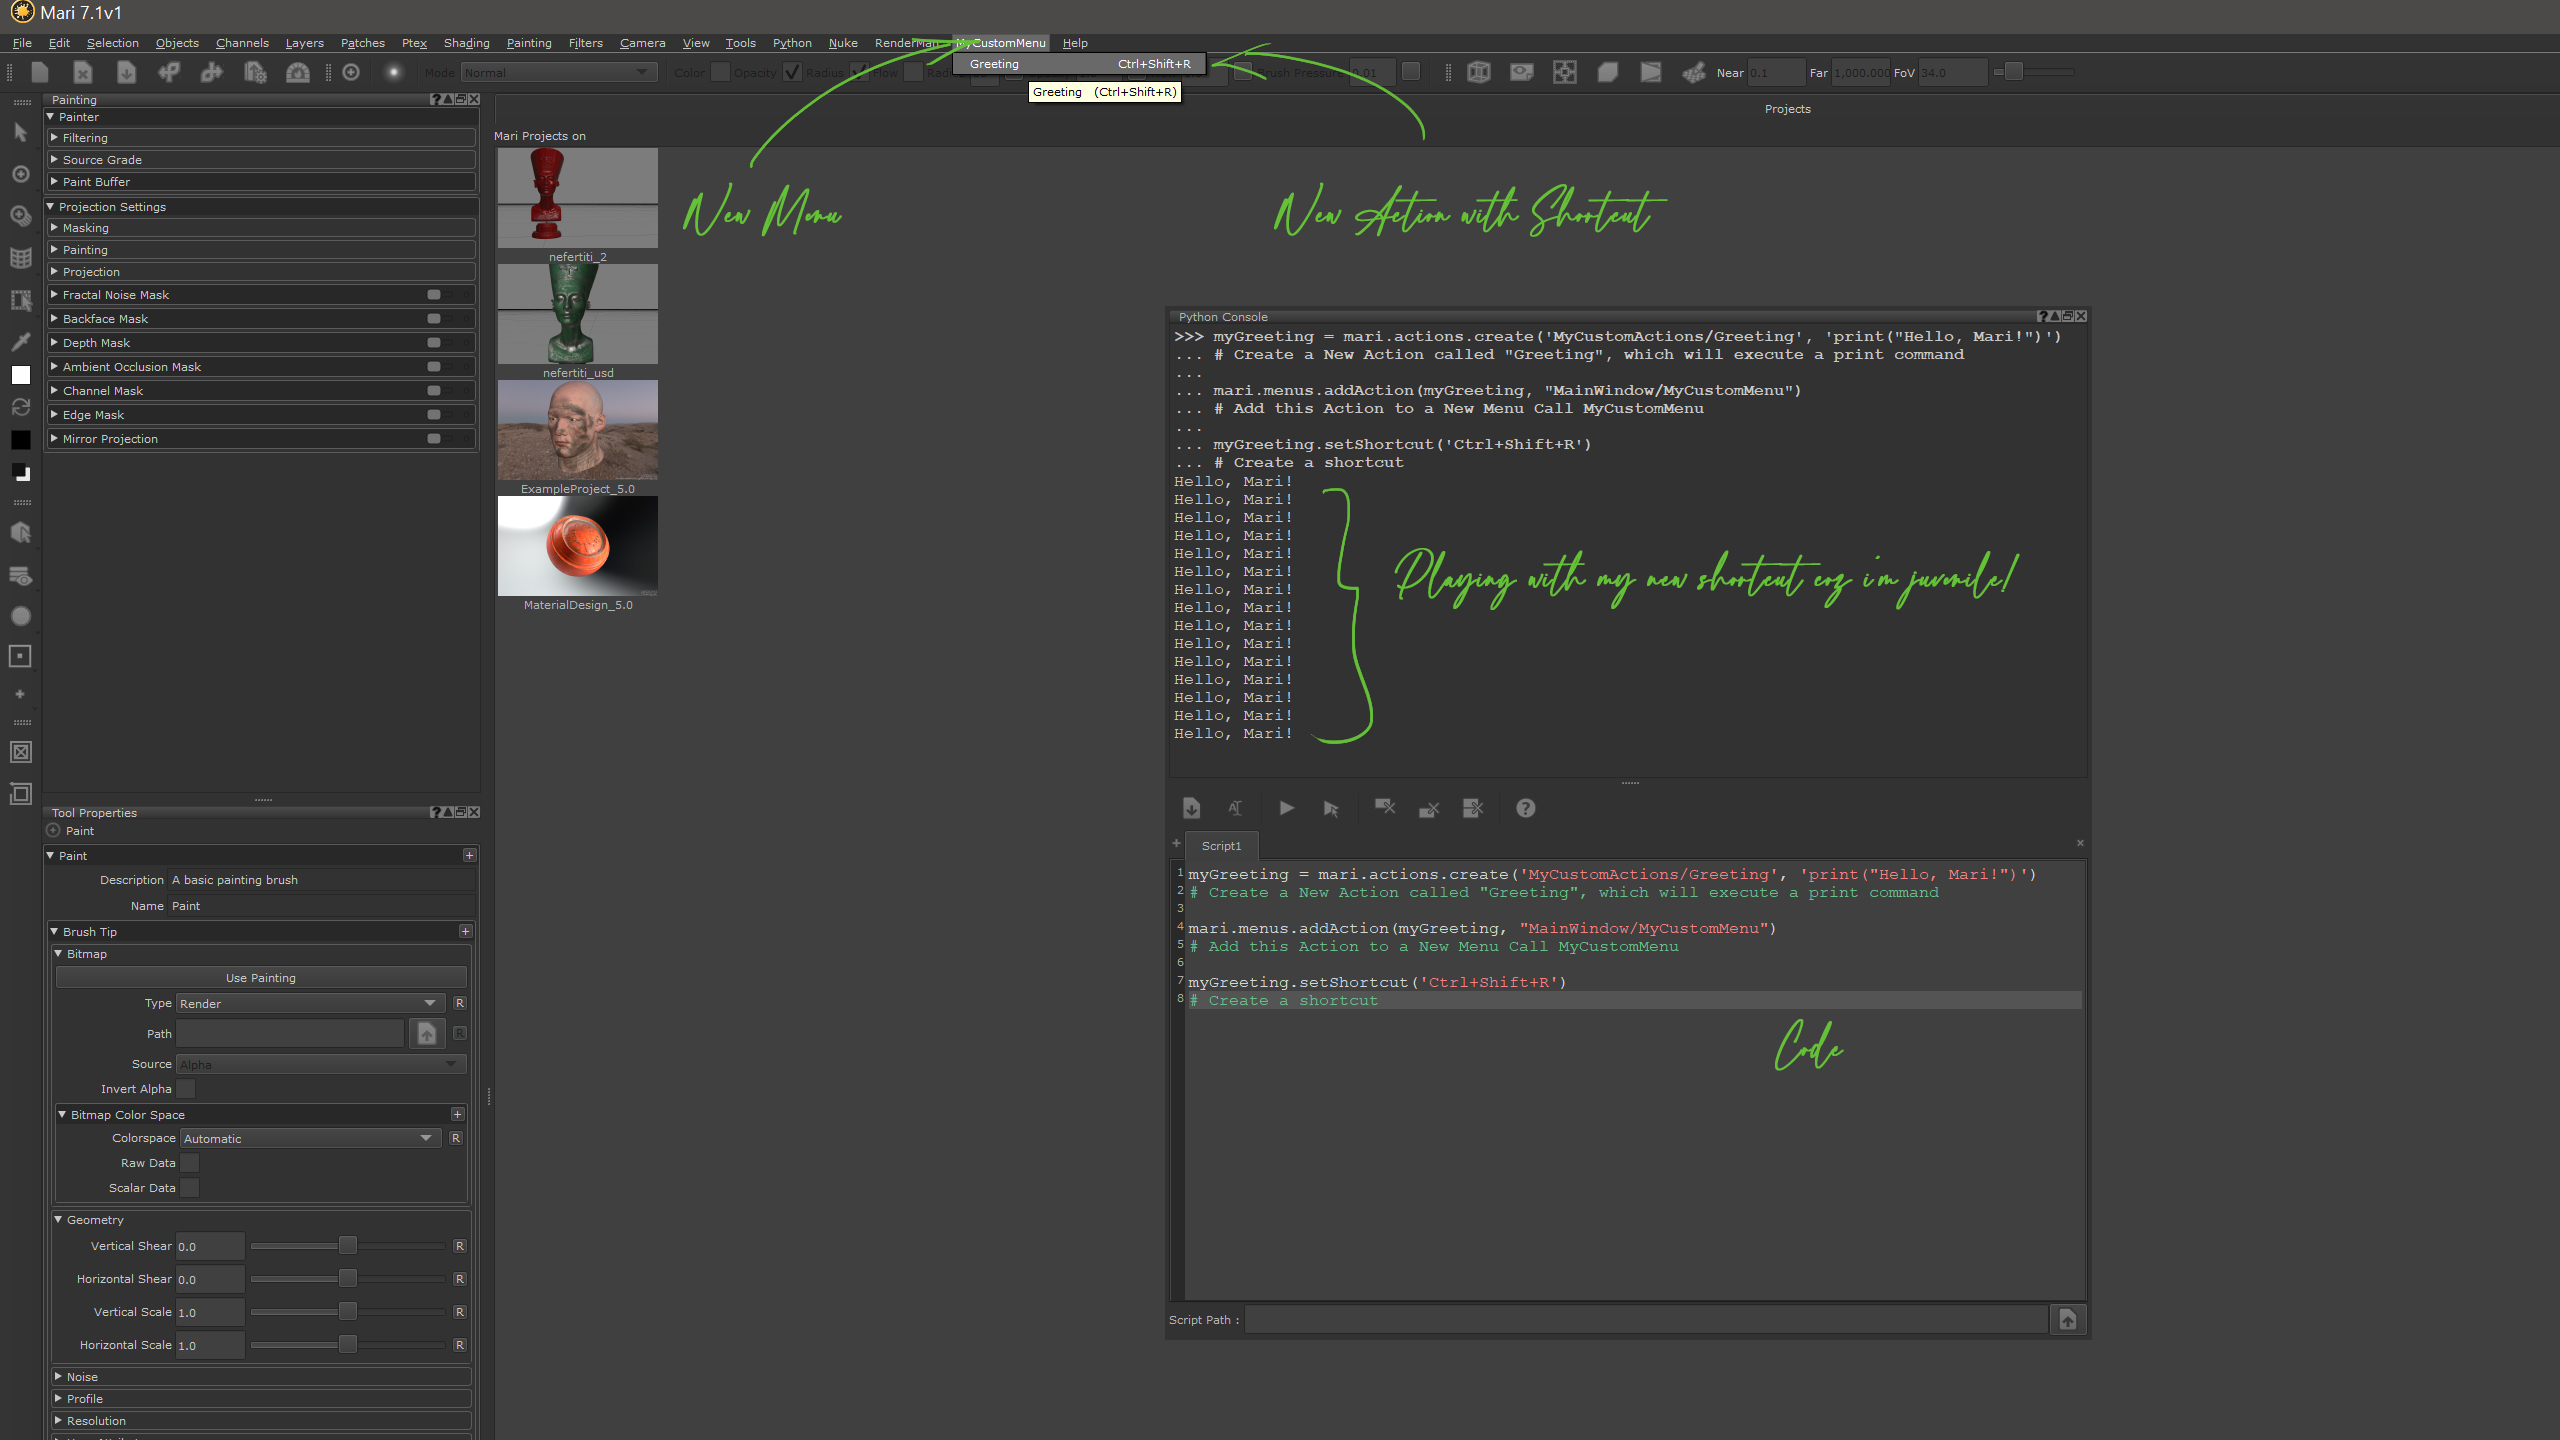
I want to create a custom action, assign it to a menu, and bind it to a keyboard shortcut—so I can hit Ctrl+Shift+R and call on the command.
This video from the foundry shows you the basics and how to create a menu and output the message “hi”.
2. Action, Mari
Mari provides the mari.actions module, which lets you create actions and assign them to menus or shortcuts. Here’s how I did it in the console:
- First line: Creates a new action named
"Hello Mari"under my custom action path. - Second line: Adds it to a custom menu called
"MyCustomMenu". - Third line: Assigns a shortcut.
2.1 What is a custom path, I hear you ask?
Short Answer:
The custom path is not your Windows/Mac file path.
It’s Mari’s internal namespace for actions and menus, telling Mari:
- Where to register the action
- What display name to use
- How to avoid conflicts with other actions
When creating actions with mari.actions.create(), Mari requires an identifier—not just a friendly name.
An identifier is basically a custom path inside Mari that serves two purposes:
- Internal Location – Think of it like a “folder path” where Mari stores your action.
Example:MyCustomActions/GreetingMyCustomActions→ the internal “folder” or namespaceGreeting→ the action’s display name in menus
- Avoids Name Conflicts – If I just called it
"Greeting"without the namespace, and later created another"Greeting", Mari might get confused.- By using a path like
"MyCustomActions/Greeting", Mari knows exactly where this command belongs and avoids clashes.
- By using a path like
As the documentation says: The identifier is more than a name—it’s a location where Mari saves your commands to avoid conflicts.
So in my example:
I’m creating an action with a clear path and display name, making it easy to organize in my custom menus later.
Once this is set up, you can trigger your new action with the shortcut, see the result in the console, and start building more complex scripts knowing Mari can recognize your commands.
3. Doing it, Just the one time!
Typing this every time Mari launches? No thanks.
Instead, I keep all my Python scripts (and other scripts for that matter) in a custom location on my disk, you know, in case shit happens (as it usually always does in CG). Makes for easy backup and migration, I can just point Mari to that same folder and everything just works. Plus, it’s just easier to manage all my tools and experiments from one location. This can get very messy very fast, again in CG.
Here’s how I set it up.
-
- Location on my drive →
F:/Resources/Scripts/Python/Mari - Then I added that folder to my Windows Environment Variables under:
- Location on my drive →
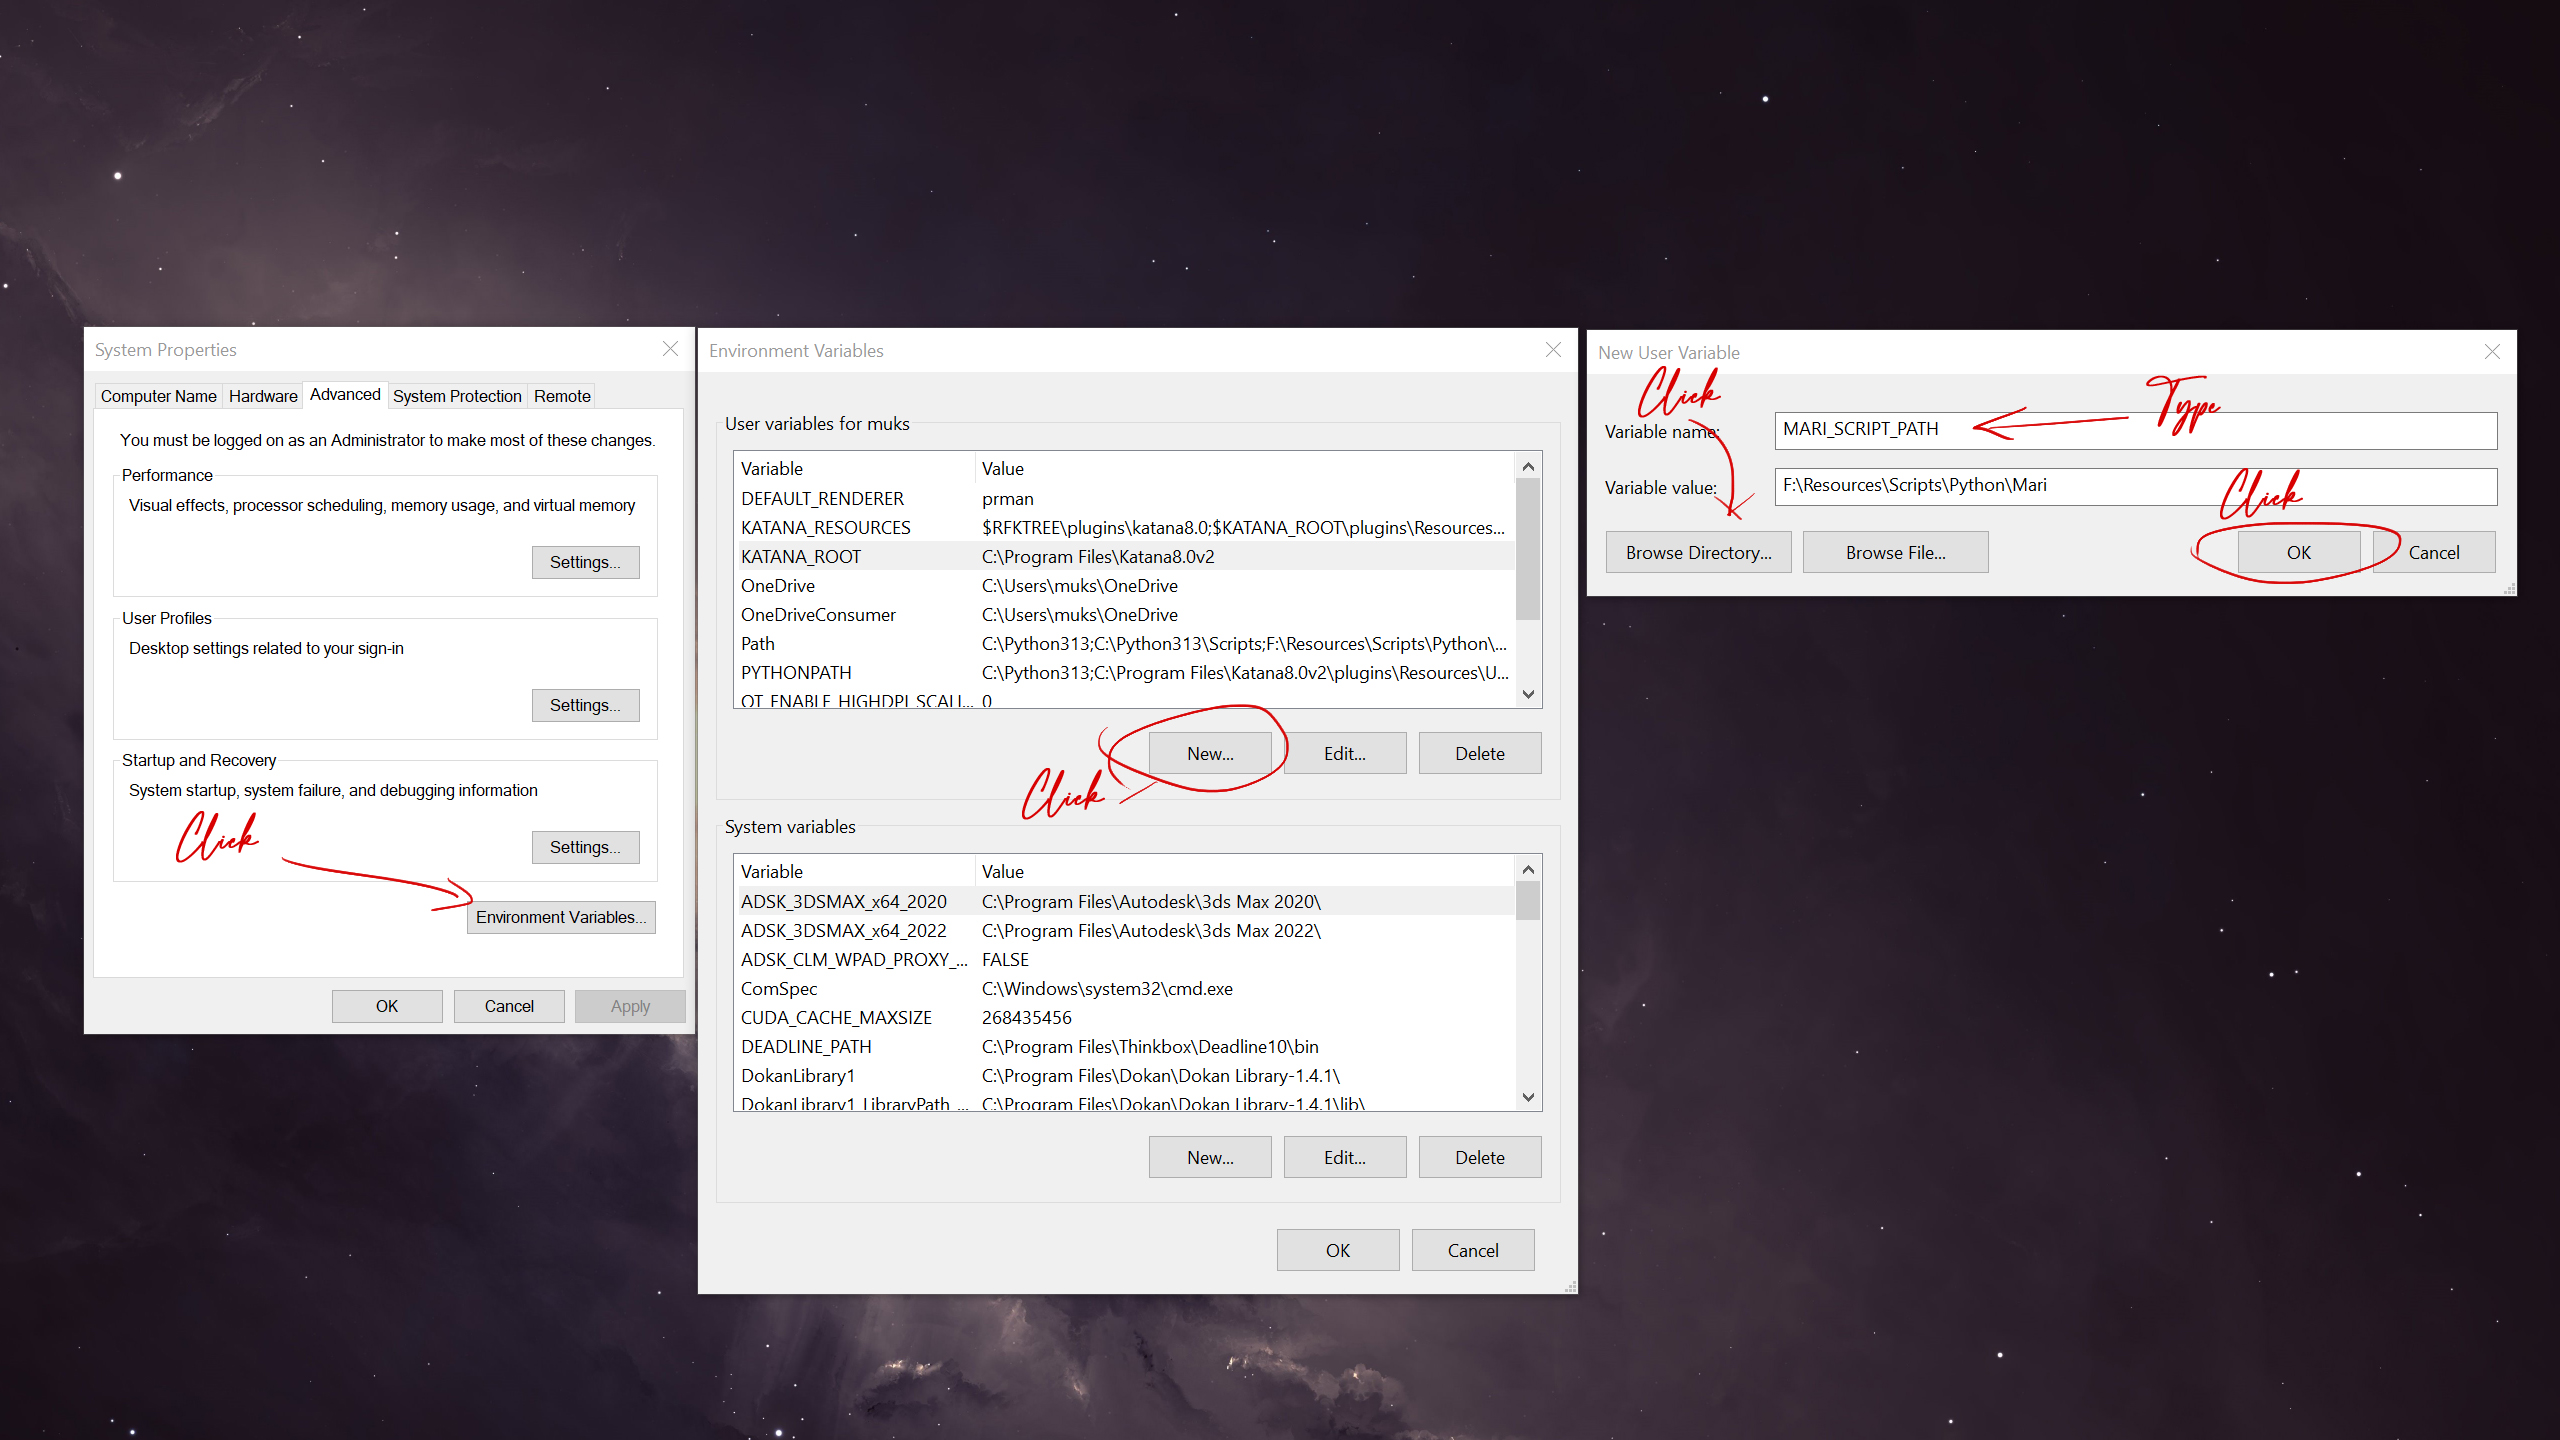
Mari will automatically scan this folder on launch and load any scripts it finds.
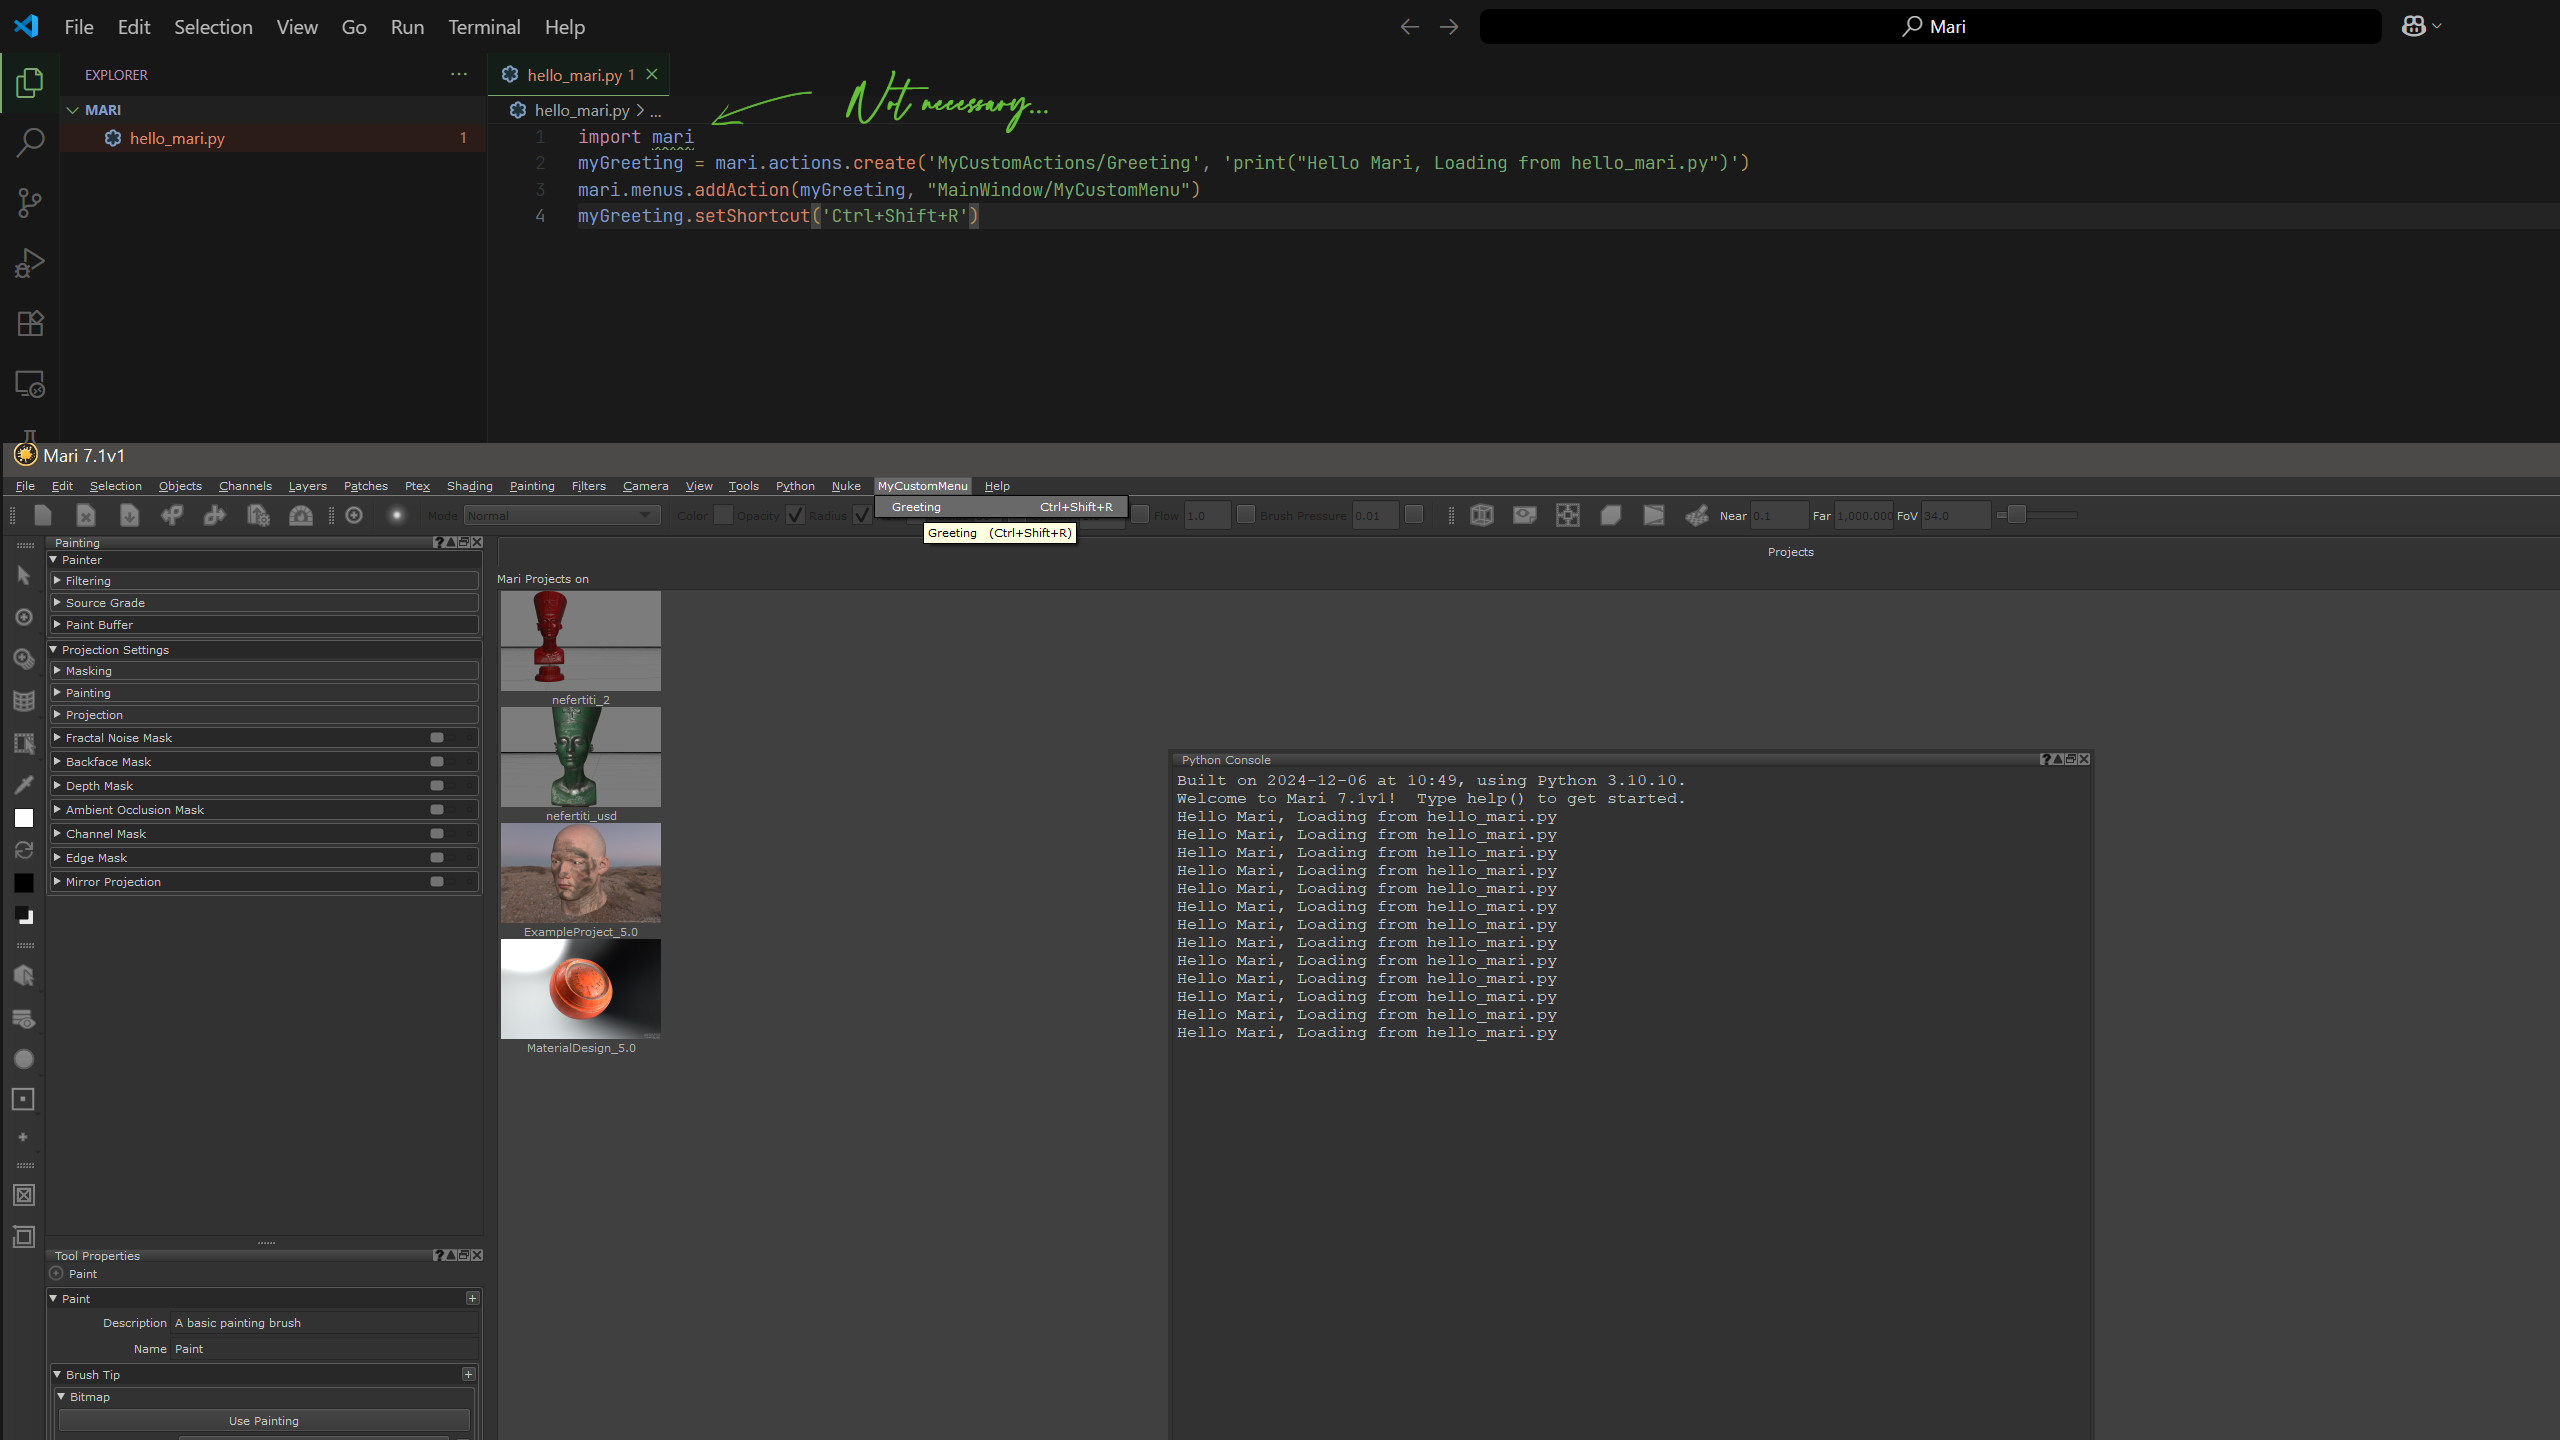
3.1 Example: Moving Our “Hello Mari” Script
- Inside the folder, I create a new Python file:
- Paste the action creation code:
- Restart Mari, and voilà — our Hello Mari action is now loaded automatically at startup.
This is also the first step toward creating a personal Mari toolkit. Every time you write a new utility or function, just drop it in this folder, and it’ll be there next time you launch Mari.
Side Note on import mari
You might see import mari at the top of my scripts. Strictly speaking, this line isn’t required when the script is running inside Mari—Mari already knows its own modules.
However, VS Code doesn’t know that Mari exists. Without this import, it will flood you with annoying red squiggles and “undefined module” warnings. Adding import mari is mostly for your editor’s sanity, not Mari’s.
Think of it as a polite little white lie to your IDE so it stops yelling at you.
3.2 Because I am a sucker for torture.. How can I make VS Code play nice with Mari
If you want to avoid unnecessary import mari lines and still have VS Code autocomplete and linting work properly, you can point your editor to Mari’s Python API.
Here’s how:
3.2.1 Locate Mari’s Python modules
These are usually tucked away somewhere inside Mari’s installation directory. If you think you can find it to the Mari install folder and typing “Python” into the search bar, (clicks tongue)!
Seriously, it took me bloody ages to find this thing, eventually, I discovering it hiding here: C:\ProgramFiles\MariX.XvX\Bundle\bin\lib\site-packages
Why is it buried this deep? Heck if I know!
Mari doesn’t even throw you a hint in its folder naming conventions—something like Mari_Python_API_Here would’ve been nice. Instead..
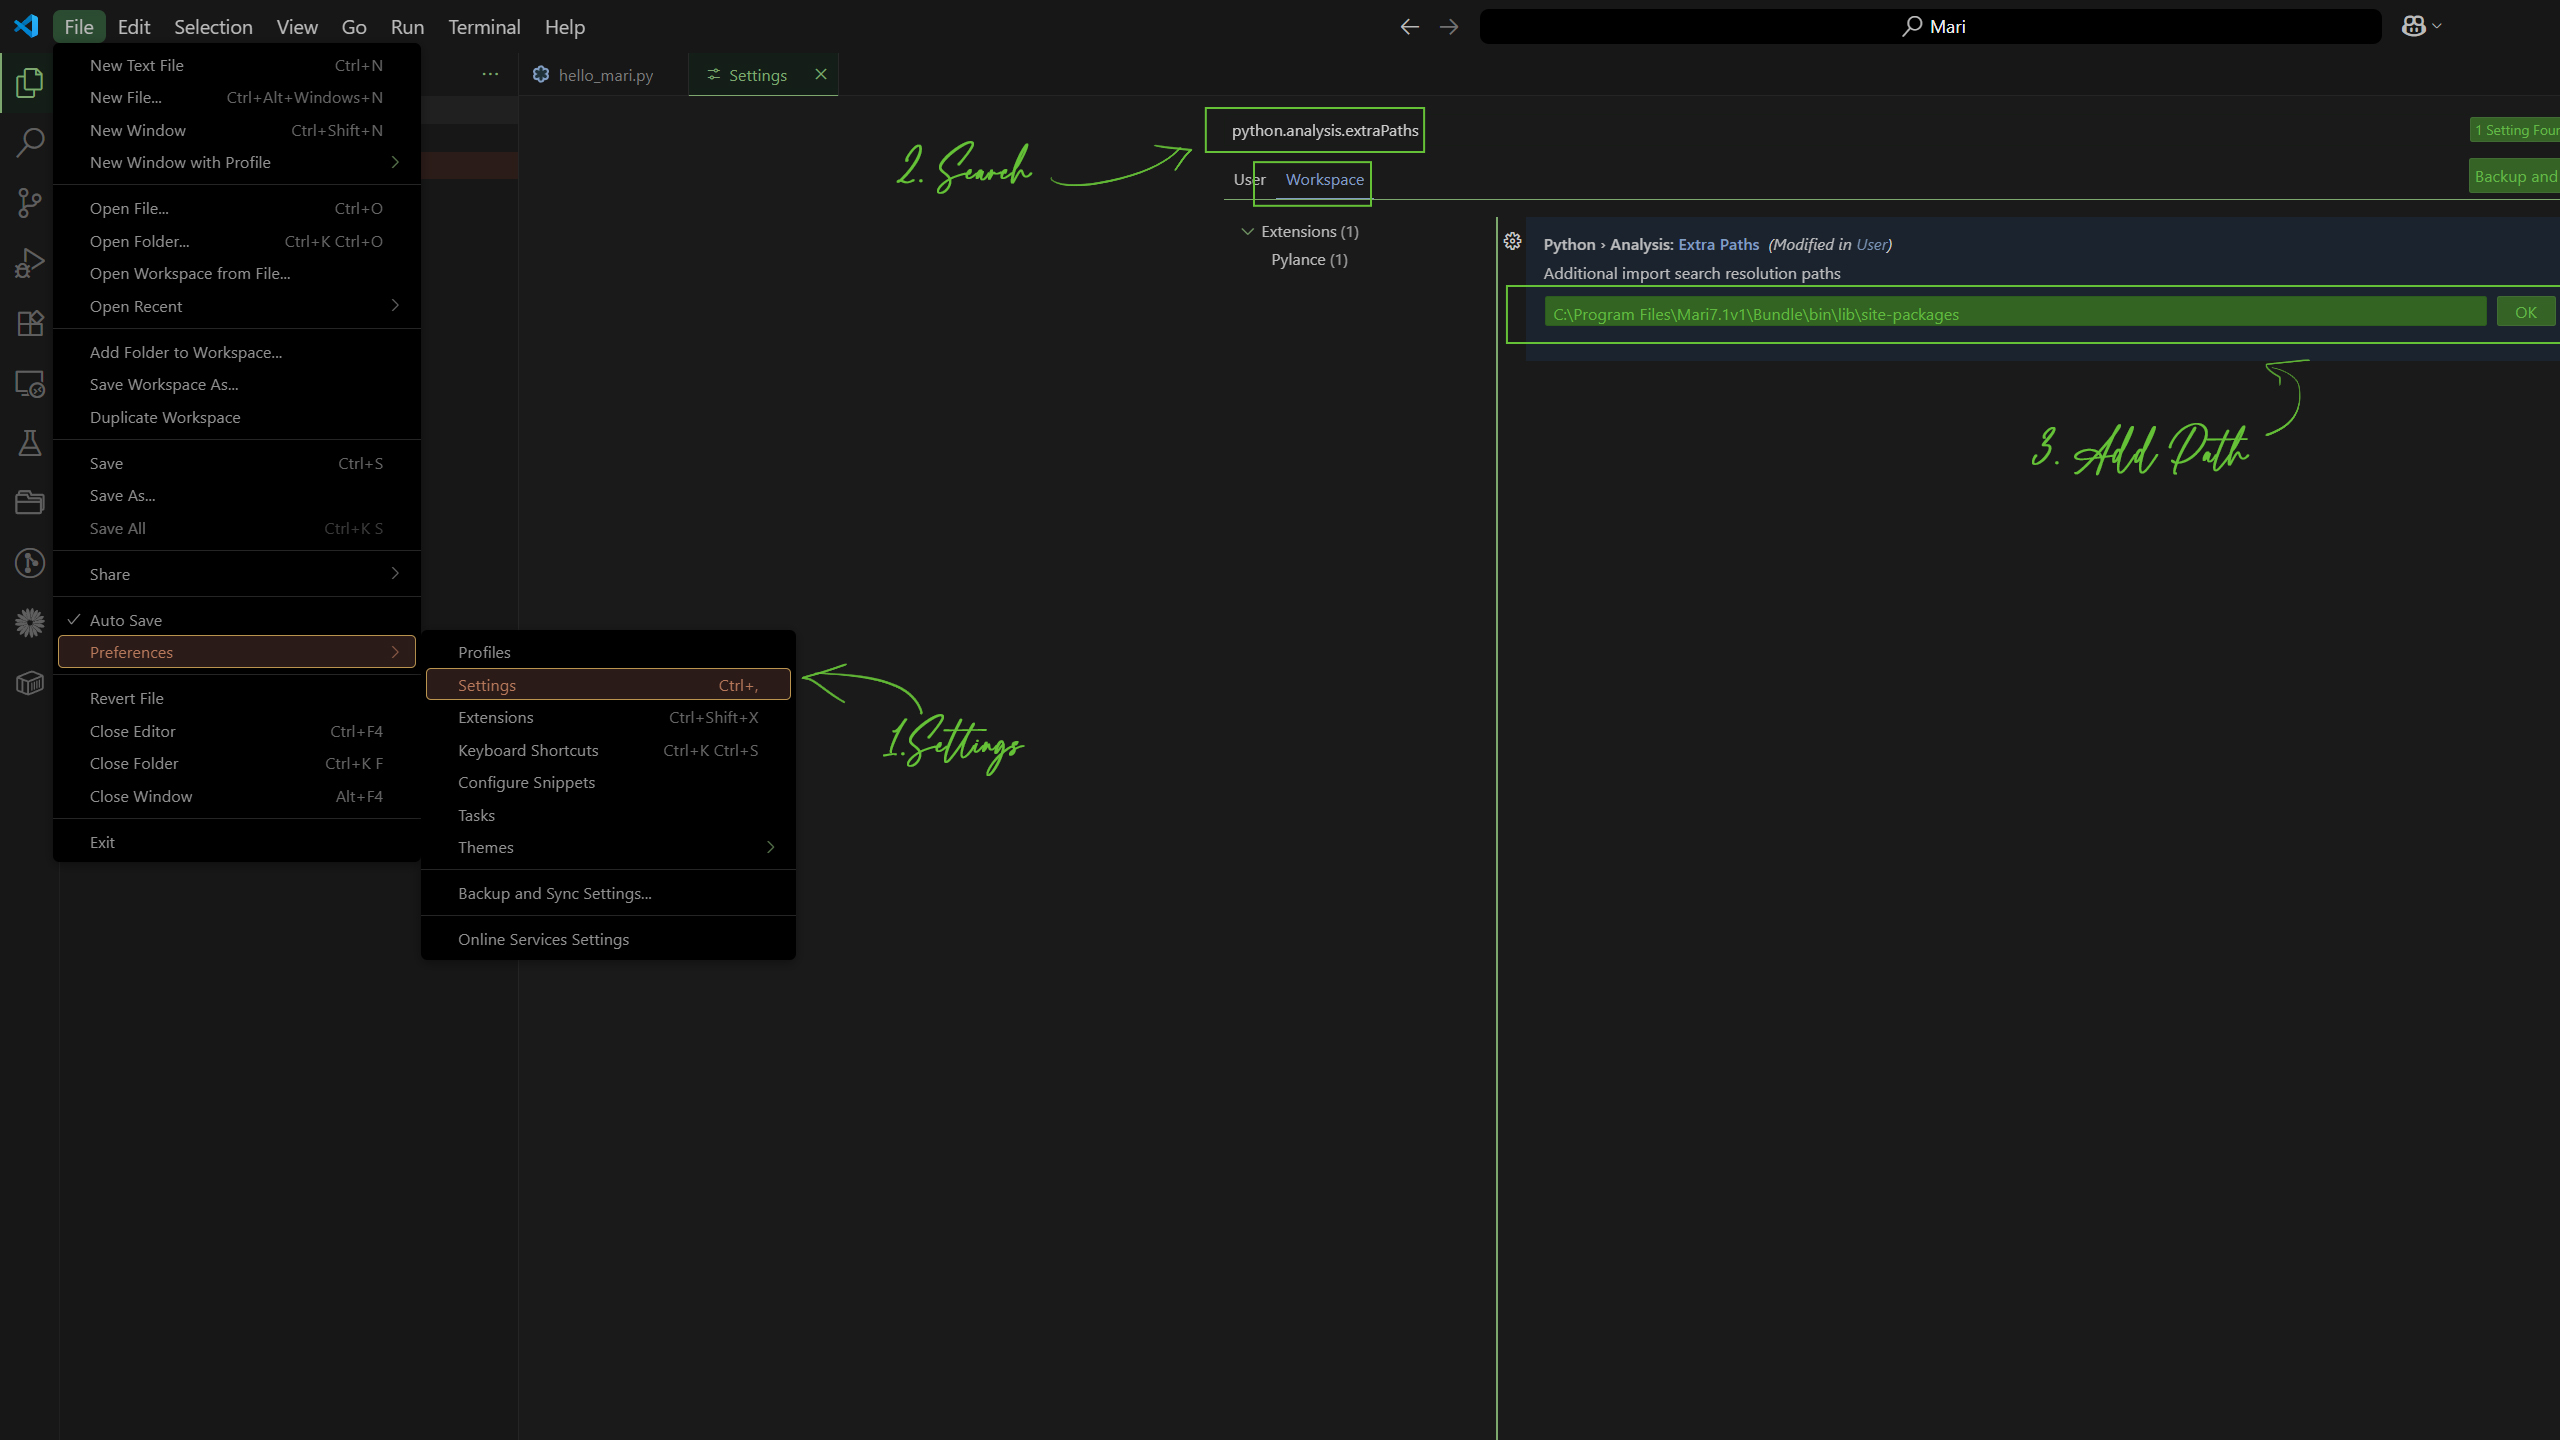
3.2.2 Add this folder to VS Code’s Python path
- Open your workspace settings
- Select the “Workspace” tab. (Although “User” is still OK)
- Using the search bar, search for the variable
python.analysis.extraPaths - Click the
Add Itembutton and paste the path to Mari’s Python API and clickOK - Restart VS Code
Now, VS Code will recognize the mari module without complaining, and you can safely remove the fake import mari line if you want.
This way, your scripts remain clean while your editor stays happy, and I can stop obsessing.
Back to it then!
4. Making it Stick – Organizing Scripts into Modules and Reloading Without Restarting!
Now that Mari is loading our startup script from a custom folder, we can start organizing our tools into modules. This keeps things neat and makes it easier to manage multiple utilities without cramming everything into one giant file.
4.1 Create a Custom Module
Inside the same folder (F:/Resources/Scripts/Python/Mari), create a new Python file and name it myTool.py and add a simple function:
4.2 Importing and Calling the Module in Mari
In your hello_mari.py script, import the module and call the function:
If everything is set up correctly, when Mari launches, you’ll see this in the console:
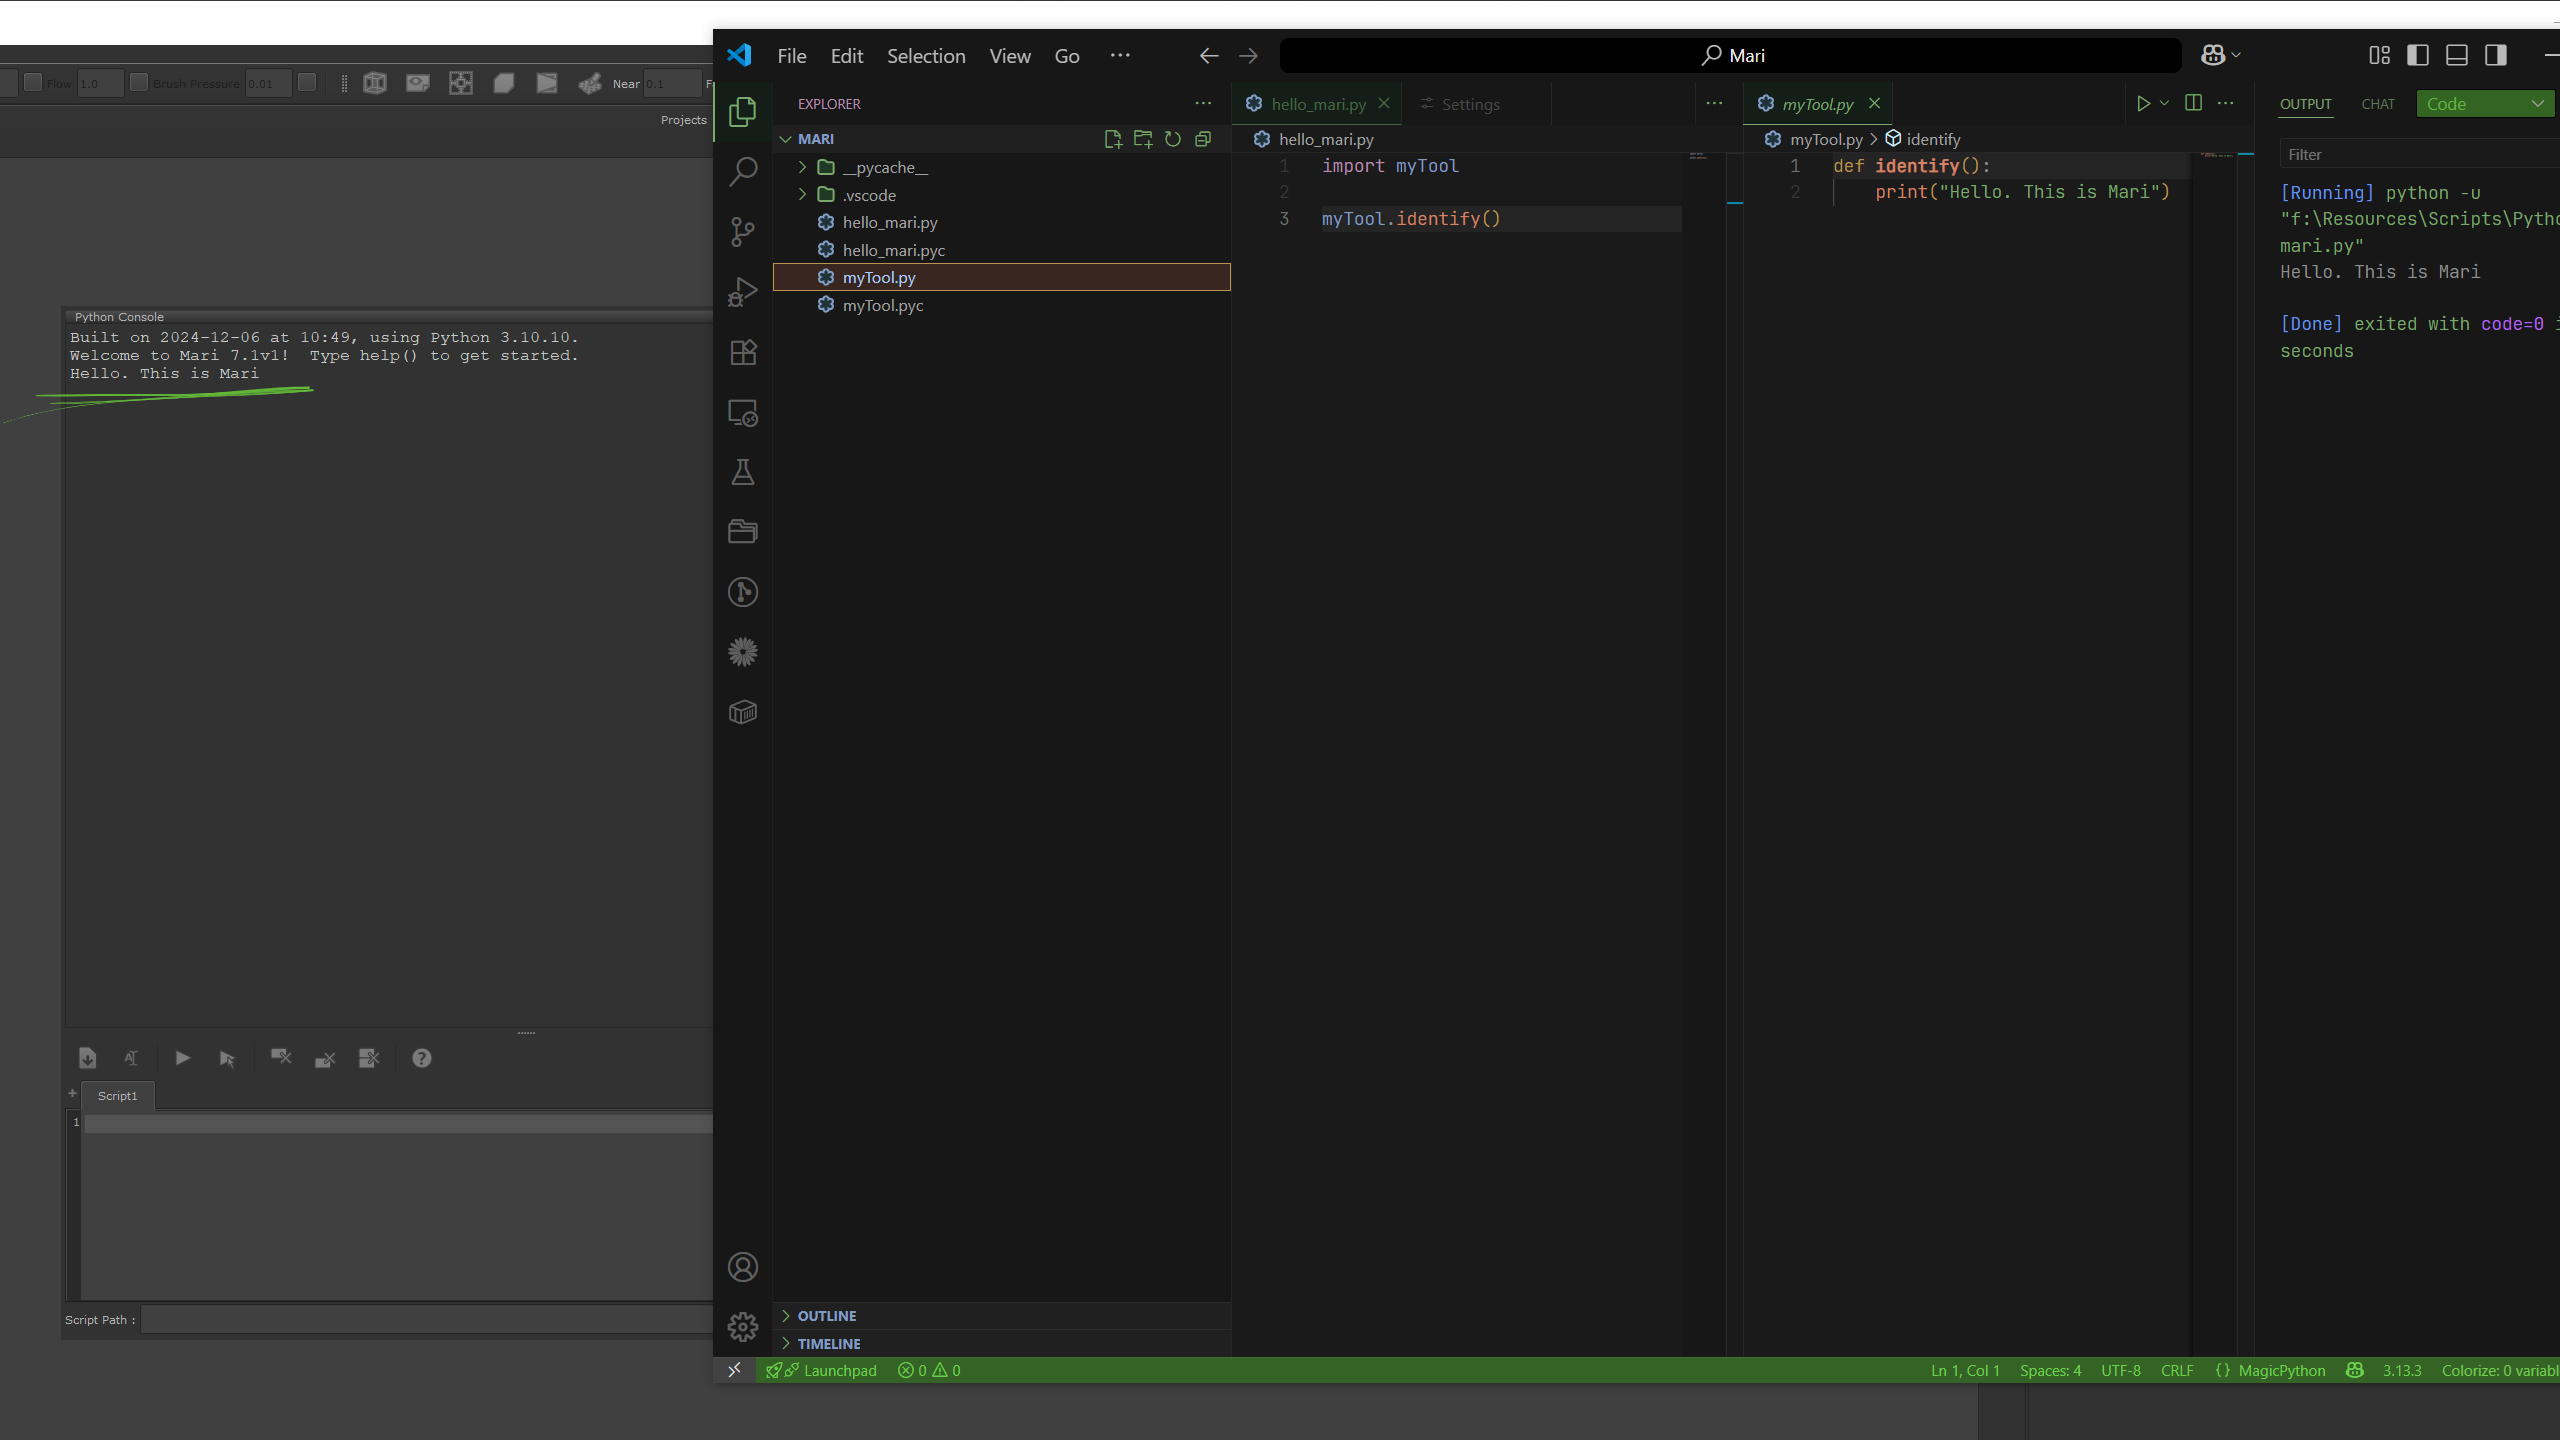
4.3 Why Changes Don’t Show Up Immediately
Here’s a little Mari-Python quirk:
If you change the code in myTool.py to:
…and call myTool.identify() again in Mari, nothing changes.
Something similar happened in Maya, but that’s for another day.
Why?
Python caches imported modules in memory. When Mari first imports myTool.py, it keeps that version loaded. Any edits to the file are ignored until you restart Mari (or Python).
4.4 Reloading Modules Dynamically
To fix this, we can force Python to reload the module using importlib.reload:
Now, the console will immediately reflect the updated output, no Mari restart required.
Awesome because:
- This workflow is essential for Mari scripting.
- It allows you to test changes in real-time and iterate quickly.
- It’s how professional pipelines keep tool development fast and frustration-free, apparently!
5. The Whole Package
Okay, so we’ve gone from:
- Typing things directly into Mari’s Python console
- To running a one-off startup script
- To importing custom modules and reloading them like a boss
Now, let’s take the next step: turning our tools into a proper Python package.
Why bother?
- It makes your tools easier to organize and scale
- Packages let you split different functionalities into their own files
- And, most importantly, Mari will treat your folder like a toolbox, loading everything neatly
5.1 Create a Package Folder
Inside your Mari scripts folder (F:/Resources/Scripts/Python/Mari), create a folder for your package. I’ll call mine myCustomTools/
Inside this folder, add a special file called __init__.py
That’s double underscores on both sides.
5.2 What Does __init__.py Even Do?
Here’s why this file is important:
- Python only treats a folder as a package if it has an
__init__.pyfile - Think of it as turning a random folder into an official Python module
- Without it, Python will ignore your folder if you try to
import myMariTools
You can leave the file empty, or you can add some setup code you want to run when the package loads.
Example:
When Mari starts up and imports your package, you’ll see that message in the console.
5.3 Let’s Bring It All Together
Now that we’ve experimented with actions, shortcuts, and dynamic module reloading, let’s organize everything into a clean package structure. This way, your tools are easy to manage, and Mari will pick up changes without needing a restart.
Folder/File Structure
Step 1: Create the __init__.py files
- Both the Mari_Custom_Folder and the myCustomTools folder need an empty
__init__.pyfile. - This tells Python: “Treat this folder as a package so imports will work.”
Step 2: Create your first tool
In your Mari custom folder, create another folder call it myCustomTools.
In that folder create a file, call it, myFirstTool.py
Step 3: Create the main script
In your main hello.py file (which hopefully you had already created):

Step 4: Test it in Mari
- Launch Mari and press Ctrl+Shift+R.
- You should see:
Step 5: Update on the Fly
- Modify myFirstTool.py:
- Run the shortcut again—no Mari restart required!
By structuring your scripts into packages and using importlib.reload(), you can iterate on tools quickly, keeping your workflow efficient and your editor happy.
5. Bounce
Understanding __init__.py and Clean Tool Organization
Remember that __init__.py is what transforms a regular folder into a Python package. Without it, Python won’t recognize your folder when you try to import it in Mari.
Think of it like stamping your folder as “official Python module territory”.
- Leave it empty if all you want is package recognition.
- Or add setup code that runs automatically when the package is imported.
Example of a clean Mari tool structure:
This structure allows you to:
- Keep your scripts organized and modular.
- Reload specific tools without restarting Mari.
- Easily copy or move your entire toolkit to another machine.
[addtoany]
Recent
-
1
-
2
-
3
-
4
-
5
-
6
-
7
-
8
-
9
-
10
